emmawhitaker
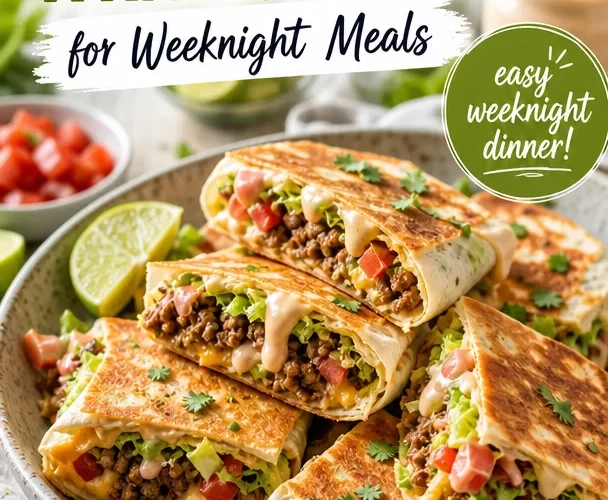
Mini Crunch Wrap Sliders: A Fun Twist on a Classic Favorite
Hello, fellow food enthusiasts! Today, I want to take you on a culinary journey that takes me right back to my childhood—where the air was always filled with the aroma of spices, laughter bubbled, and every meal was an adventure. We’re talking about Mini Crunch Wrap Sliders, a dish that not only brings joy but also packs tons of flavor in every bite. These delightful sliders are perfect for busy weeknights, weekend gatherings, or even a cozy dinner for two. So put on your apron, grab a cup of your favorite brew, and let’s dive into the delicious world of crunch wraps!
Growing up, dinners were always a big deal in my family. My mom had this knack for turning simple ingredients into something magical. I remember one night when she surprised us with her take on tacos. It was a simple affair—just ground beef, some fresh veggies, and cheese—but it became an instant family-favorite classic. Fast forward to today, and I’ve taken that nostalgia and given it a fun twist with these Mini Crunch Wrap Sliders. Imagine those same flavors, but wrapped up and layered into a cute and crave-worthy slider. Trust me; your taste buds are going to thank you!
These sliders are not just quick and easy; they also invite everyone to join in on the fun of assembly. You can get creative with the fillings, bringing the family together to customize their own wraps just the way they like them. Plus, they’re the ultimate answer to what to serve for game day, movie night, or a relaxed Sunday dinner. Let’s channel that home-cooked love and create something that feels just as good to eat as it does to make. Are you ready? Let’s get cooking!
Personal Story
I’ll never forget the day I first made these mini crunch wraps during a sleepover with my childhood best friend, Sarah. We decided to play chef for the night, armed with a few simple ingredients we found in the pantry. We giggled as we piled everything onto our tortillas, trying to outdo each other with wild combinations of toppings. The rule was simple: make it colorful, make it bold!
That night, as we sat cross-legged on the living room floor, our plates overflowing with our unique creations, we felt like culinary geniuses. Each crunchy bite was a delightful mix of flavors and textures, and we reveled in the shared experience of bonding over good food. Little did I know then that this would sprout into a recipe that I’d continue to make and share for years to come. Those memories of laughter and dishes overflowing with color and zest are embedded in my heart. It’s moments like these that inspire me to cook and why I love sharing these slider adventures with you all.
Ingredients
Here’s what you’ll need to whip up these tasty Mini Crunch Wrap Sliders:
- Tortillas (Flour or Corn): The base for your wraps! Flour tortillas are soft and pliable, while corn tortillas add a lovely crunch. If you’re looking for a gluten-free option, corn tortillas are your friend.
- Ground Beef or Turkey: Offers a hearty protein source. You can easily substitute lean ground chicken or even plant-based meat alternatives for a lighter or vegetarian option.
- Cheddar Cheese: My go-to choice for melting goodness! Cheddar brings that classic flavor. Feel free to mix it up with Monterey Jack for a creamier texture or try Pepper Jack if you’re craving a little heat.
- Lettuce: Crunchy romaine or vibrant green leaf lettuce adds freshness. If you want to mix it up, try using spinach or kale for a bit of added nutrition.
- Tomato: Juicy tomatoes add vibrant flavor and color. Don’t have fresh tomatoes? Diced canned tomatoes work in a pinch.
- Sour Cream: For that creamy finish! If you’re looking for a healthier option, Greek yogurt makes a great substitute with a nice tang.
- Taco Seasoning: Essential for that authentic flavor punch. You can make your own mix using cumin, chili powder, garlic powder, and paprika, or use store-bought for convenience.
- Avocado: Creamy and dreamy, avocado enhances the richness of the wrap. If you’re feeling extra adventurous, you might swap it for guacamole for even more flavor!
- Tortilla Chips: For a crunchy surprise inside each wrap! Choose nacho-flavored chips for an added kick or go for classic tortilla chips if you prefer a milder crunch.
Step-by-Step Instructions
Now that we’ve gathered our ingredients, let’s get cooking! Follow these easy steps to create your mini crunch wrap sliders:
- Cook the Meat: In a skillet over medium heat, add a splash of oil and the ground beef or turkey. Use a spatula to break it apart as it cooks. Sprinkle your taco seasoning over the meat once it’s browned (about 5-7 minutes). Stir it all together until the meat is coated in the delicious spices. Make sure it’s well cooked, and then drain any excess fat.
- Chef Insight: Using lean ground meat helps reduce the grease, making for a cleaner bite. If you find the mixture a bit dry, add a splash of water to help the spices adhere better.
- Prep the Veggies: While your meat is sizzling, chop your lettuce, dice your tomatoes, and, if you’re using fresh avocado, slice it up, too! Make sure everything is bite-sized for easy assembly.
- Tip: If you’re using avocado, squeeze a little lime juice over it to prevent browning while you prepare the rest.
- Assemble Your Wraps: It’s time to get creative! Take a tortilla and lay it flat. Start by layering a spoonful of the seasoned meat in the center. Add a sprinkle of cheese, followed by the lettuce, tomato, and avocado. Finally, add a dollop of sour cream and some tortilla chips for that extra crunch!
- Chef Hack: Putting the cheddar on the meat helps it melt beautifully and keep everything together as you fold.
- Fold It in: Here comes the fun part! Carefully fold the edges of the tortilla towards the center, like you’re tucking in a little gift. You want all those delicious fillings snugly wrapped inside.
- Pro Tip: If your tortillas are cracking, warm them slightly in a dry skillet or microwave for a few seconds. This softens them up, making folding a breeze.
- Cook the Wraps: Heat a non-stick skillet over medium heat and lightly coat it with oil. Place your folded wraps seam-side down in the skillet. Cook for about 3-4 minutes on each side until golden brown and crispy. Repeating this process for each wrap will ensure everyone gets to enjoy a crunchy treat!
- Chef’s Insight: Don’t crowd the skillet; cook in batches if necessary. This way, you get an even crisp outside!
Serving Suggestions
When it comes to serving these Mini Crunch Wrap Sliders, you can get creative! Arrange them on a beautiful platter with a side of salsa, guacamole, or extra sour cream. Add a sprinkle of fresh cilantro or lime wedges for that finishing touch.
For a fun twist, serve them as part of a “slider station” where guests can build their own wraps with assorted toppings. This makes for a festive and interactive meal that’s pure fun!
Recipe Variations
Looking to change things up? Here are a few ideas:
- Spicy Crunch Wraps: Add some jalapeños or swap your shredded cheese for spicy Pepper Jack.
- Veggie Version: Use black beans or quinoa in place of meat for a fiber-packed vegetarian option.
- BBQ Flavor: Mix BBQ sauce into the meat for a tangy twist, and top with coleslaw instead of traditional toppings.
- Breakfast Crunch Wraps: Swap meat for scrambled eggs and add breakfast potatoes for a delicious breakfast treat!
- Cheesy Nacho Crunch Wraps: Incorporate nacho cheese sauce and crushed tortilla chips into your filling for an extra cheesy experience.
Chef’s Notes
As I reflect on my journey with these mini crunch wraps, I can’t help but smile. Initially, they were just a fun idea to engage my friends and family in cooking. Over the years, I’ve added my personal flair, and they’ve evolved from a simple meal into a party favorite. I love how adaptable they are—they’re perfect for any occasion.
And let’s not forget about the little kitchen mishaps that have shaped this recipe. I remember the first time I tried to fold the wraps; let’s just say that some ended up looking like a Christmas gift gone wrong! But that was part of the joy; every attempt brought laughter and a delicious outcome.
FAQs and Troubleshooting
1. What if my wraps are falling apart?
Make sure you’re tucking in all the ingredients well and fold tightly. Warming the tortillas slightly before assembling helps hold them together.
2. Can I prepare these in advance?
Absolutely! You can prepare the filling ahead of time and assemble the wraps just before serving, so they’re fresh and crisp.
3. Is it okay to freeze these?
Yes! You can freeze the assembled wraps before cooking. Just make sure to separate them with parchment paper so they don’t stick together. When ready to eat, cook them straight from frozen—it might take a couple of extra minutes.
4. How can I store leftovers?
Store uneaten wraps in an airtight container in the fridge for 1-2 days. You can reheat them in a skillet or microwave, but they’ll lose that fresh crispy texture.
Nutritional Info
While the calorie count and nutritional info can vary based on your specific ingredient choices, here’s a rough estimate per slider:
- Calories: 250 kcal
- Protein: 12g
- Carbohydrates: 32g
- Fats: 10g
Note: Adjust based on substitutions and inclusions like additional toppings.
And there you have it—your guide to making the most delicious Mini Crunch Wrap Sliders that are sure to please any crowd! Cooking should always feel exciting, approachable, and fulfilling. So gather your loved ones, roll up your sleeves, and dive into a flavorful experience that celebrates good food and great company. Happy cooking!
PrintMini Crunch Wrap Sliders

A fun twist on a classic favorite, these Mini Crunch Wrap Sliders are packed with flavor and perfect for gatherings.
- Prep Time: 15 minutes
- Cook Time: 20 minutes
- Total Time: 35 minutes
- Yield: 4 servings
- Category: Main Course
- Method: Cooking
- Cuisine: Mexican
- Diet: Optional Vegetarian
Ingredients
- Tortillas (Flour or Corn)
- Ground Beef or Turkey
- Cheddar Cheese
- Lettuce
- Tomato
- Sour Cream
- Taco Seasoning
- Avocado
- Tortilla Chips
Instructions
- Cook the Meat: In a skillet over medium heat, add a splash of oil and the ground beef or turkey. Use a spatula to break it apart as it cooks. Sprinkle your taco seasoning over the meat once it’s browned (about 5-7 minutes). Stir it all together until the meat is coated in the delicious spices. Make sure it’s well cooked, and then drain any excess fat.
- Prep the Veggies: While your meat is sizzling, chop your lettuce, dice your tomatoes, and, if you’re using fresh avocado, slice it up, too! Make sure everything is bite-sized for easy assembly.
- Assemble Your Wraps: Take a tortilla and lay it flat. Layer a spoonful of the seasoned meat in the center, followed by cheese, lettuce, tomato, avocado, sour cream, and tortilla chips.
- Fold It in: Carefully fold the edges of the tortilla towards the center, wrapping all the fillings snugly inside.
- Cook the Wraps: Heat a non-stick skillet over medium heat and lightly coat it with oil. Place your folded wraps seam-side down and cook for about 3-4 minutes on each side until golden brown and crispy.
Notes
For a fun twist, serve as part of a ‘slider station’ where guests can build their own wraps. You can also freeze the assembled wraps before cooking.
Nutrition
- Serving Size: 1 slider
- Calories: 250
- Sugar: 2g
- Sodium: 500mg
- Fat: 10g
- Saturated Fat: 4g
- Unsaturated Fat: 4g
- Trans Fat: 0g
- Carbohydrates: 32g
- Fiber: 3g
- Protein: 12g
- Cholesterol: 40mg
Keywords: mini crunch wraps, sliders, easy recipes, quick meals, taco inspired