emmawhitaker
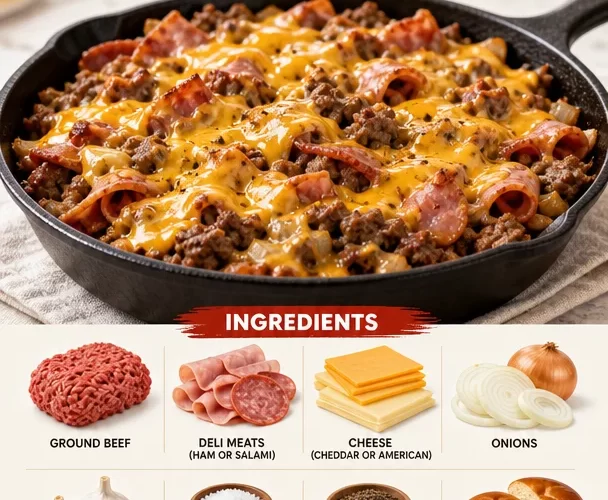
The Joy of Cooking: Grinder Cheeseburger Skillet
Welcome to my kitchen! Today, we’re diving into a recipe that’s as comforting as your favorite sweater and packed with flavor that will have everyone at the table reminiscing about the good times. I’m talking about the delightful Grinder Cheeseburger Skillet! This dish is a wonderful, melty mashup of classic cheeseburgers and savory deli meats, all prepared in one pan. You’ll find this recipe is not just delicious—it’s also an accessible way to whip up a hearty meal that feels like a warm hug after a long day.
There’s something incredible about the sizzle of meat hitting a hot skillet that brings instant relief, wouldn’t you agree? Imagine that sound—juicy beef sizzling away, onions becoming translucent, and cheese melting into a gooey blanket over everything. It’s like a symphony for your senses! And the best part? It all comes together in one pan, making clean-up a breeze so you can spend more time enjoying your dinner, and less time washing dishes. Let’s embark on this culinary adventure together!
A Taste of Nostalgia
If there’s anything I cherish, it’s the simple meals I enjoyed as a child. I remember one Saturday in particular—my dad decided to take the reins in the kitchen for our family lunch. He whipped up a mix of ground beef and leftover deli meats he had, inspired by the classic cheeseburgers we all loved. He tossed in some cheese, onions, and garlic, creating something truly magical! The aroma wafting through the house was irresistible, and as we gathered around the kitchen table, our laughter mixed with the savory scent, creating a memory I still cherish.
That day, we learned that cooking doesn’t have to be perfect to be great; it simply needs to be made with a bit of love and creativity. This Grinder Cheeseburger Skillet is a modern twist on that delicious memory. It’s practical for busy weeknights while still wrapping you in the warmth of nostalgia—just like my dad’s meals!
Ingredients
Let’s take a look at what you need for this amazing Grinder Cheeseburger Skillet. Here’s a handy list:
-
Ground Beef
- The star of the show! Choose lean ground beef (80/20) for a juicy, flavorful experience. Ground turkey or chicken can also work for lighter options.
-
Deli Meats (such as ham or salami)
- This is where the magic happens. Deli meats add depth and a savory twist to the dish. Swap them out for turkey or roast beef for a different flavor profile.
-
Cheese (such as cheddar or American)
- Melty, gooey goodness! Cheddar adds a sharp edge, while American melts beautifully. You could even try pepper jack for a kick.
-
Onions
- Sweet onions, like Vidalia, lend a natural sweetness. Sautéing them unlocks their full potential! You can use shallots for a subtler flavor.
-
Garlic
- Adds a savory touch. Minced garlic is always my go-to. If you’re in a pinch, garlic powder works too, but fresh is best!
-
Salt and Pepper
- Essential seasoning to make all the flavors pop. Freshly cracked black pepper always adds a touch of sophistication.
-
Burger Buns
- Ideal for serving this delightful mixture! Use any buns you like, but I personally adore brioche or whole grain for added texture.
Step-by-Step Instructions
Ready to cook? Let’s get started! Follow these steps and don’t forget to enjoy the process:
-
Sauté the Onions:
- In a large skillet, heat a drizzle of oil over medium-high heat. Once hot, add diced onions and sauté until they turn translucent and fragrant (about 3-4 minutes). Pro chef tip: sprinkle a pinch of salt to help draw out the moisture!
-
Add Garlic:
- Toss in the minced garlic and sauté for an additional 30 seconds to 1 minute. You want it fragrant but not burnt—burnt garlic can become bitter!
-
Cook the Ground Beef:
- Push the onions to the side and add the ground beef to the pan. Break it up with a spatula and cook until browned (about 5-7 minutes). Stir occasionally to ensure even cooking. Remove any excess grease if desired (but some fat adds flavor!).
-
Mix in Deli Meats:
- Once the beef is browned, stir in the chopped deli meats of your choice. Allow them to warm up and mingle with the beef for about 2-3 minutes.
-
Season It Up:
- Sprinkle salt and pepper over the mixture to taste. Remember to taste as you go! You might want to add more seasoning as needed, based on your palate.
-
Melt the Cheese:
- Lower the heat and sprinkle a generous amount of cheese over the meat mixture. Cover with a lid or a piece of foil and let it sit for about 2-3 minutes until the cheese has melted into a deliciously gooey topping.
-
Toast the Buns:
- While the cheese melts, heat another skillet (or use the oven) to toast the burger buns. A touch of butter on the insides makes them irresistibly crunchy!
-
Serve It Up:
- Spoon the cheesy mixture over the toasted buns and serve immediately with your favorite toppings like lettuce, pickles, or even jalapeños for a spicy kick!
Serving Suggestions
To elevate your dinner experience, consider serving the Grinder Cheeseburger Skillet with a side of crispy sweet potato fries or a fresh garden salad. Presentation is key! Arrange the mixture generously across the bun, topping with sliced pickles, a dollop of mustard, or even a splash of barbecue sauce. Don’t forget to serve with napkins—this dish can get a little messy!
Recipe Variations
Feel free to get creative with this recipe! Here are a few variations to cater to all taste buds:
- Spicy Kick: Add diced jalapeños to the mix or use spicy pepper jack cheese.
- Veggie Delight: Substitute half the beef for grated zucchini or mushrooms for a hearty, veggie-packed option.
- BBQ Bliss: Mix in barbecue sauce for a tangy-sweet flavor, perhaps even topping with cole slaw for texture.
- Breakfast Edition: Add scrambled eggs and serve on an English muffin for a breakfast twist!
- Low-Carb Option: Skip the buns and serve the mixture over a bed of lettuce for a low-carb, keto-friendly meal.
Chef’s Notes
Looking back, this Grinder Cheeseburger Skillet has come a long way from my dad’s improvisational cooking style. I’ve swapped in different cheeses and deli meats based on what I have available, which has opened up a world of flavors! Plus, every time I make this dish, I’m reminded of that Saturday lunch growing up. Cooking is all about those warm moments and magic memories. And the best part? You can invite friends and family over for a fun night in as you make this dish together! You might even find a new favorite in the process.
FAQs and Troubleshooting
Got questions? Don’t worry; I’ve got you covered!
-
Can I use ground turkey instead of beef?
- Absolutely! Ground turkey is a fantastic substitute. Just brine it with some seasoning since it can be leaner and drier than beef.
-
What do I do if my cheese isn’t melting?
- Ensure your skillet is over low heat, and give it a few extra minutes under the lid. You might also want to add a splash of milk to help it melt smoothly.
-
Can I make this ahead of time?
- Definitely! You can prepare the meat mixture beforehand and warm it up when you’re ready to eat. Just store it in an airtight container in the fridge.
-
What if I don’t have burger buns?
- No worries! You can serve it over rice, in lettuce wraps, or even on top of nachos for a fun twist.
Nutritional Info
While I believe in enjoying your meals, being aware of nutrition can also be beneficial. A typical serving of this Grinder Cheeseburger Skillet with buns can provide a hearty serving of protein, along with some healthy fats.
In conclusion, food is about enjoyment and those warming moments spent with loved ones. This Grinder Cheeseburger Skillet will take you back to those cozy evenings filled with laughter and comfort. So put on your apron, gather your ingredients, and let’s create a masterpiece together! Happy cooking!
PrintGrinder Cheeseburger Skillet

A comforting and flavorful one-pan dish that combines the essence of cheeseburgers with savory deli meats, perfect for busy weeknights.
- Prep Time: 15 minutes
- Cook Time: 20 minutes
- Total Time: 35 minutes
- Yield: 4 servings 1x
- Category: Main Course
- Method: Stovetop
- Cuisine: American
- Diet: Omnivore
Ingredients
- 1 pound Ground Beef (80/20)
- 1/2 pound Deli Meats (such as ham or salami)
- 1 cup Cheese (such as cheddar or American)
- 1 medium Onion, diced
- 3 cloves Garlic, minced
- Salt and Pepper to taste
- 4 Burger Buns
Instructions
- Sauté the Onions: In a large skillet, heat a drizzle of oil over medium-high heat. Once hot, add diced onions and sauté until they turn translucent and fragrant (about 3-4 minutes).
- Add Garlic: Toss in the minced garlic and sauté for an additional 30 seconds to 1 minute.
- Cook the Ground Beef: Push the onions to the side and add the ground beef to the pan. Cook until browned (about 5-7 minutes).
- Mix in Deli Meats: Stir in the chopped deli meats of your choice and allow them to warm up for about 2-3 minutes.
- Season It Up: Sprinkle salt and pepper over the mixture to taste.
- Melt the Cheese: Lower the heat and sprinkle cheese over the meat mixture, cover, and let it sit for 2-3 minutes.
- Toast the Buns: Heat another skillet to toast the burger buns.
- Serve It Up: Spoon the cheesy mixture over the toasted buns and serve immediately.
Notes
For variations, consider using spicy pepper jack cheese or substituting half the beef for grated zucchini or mushrooms.
Nutrition
- Serving Size: 1 serving
- Calories: 450
- Sugar: 3g
- Sodium: 800mg
- Fat: 25g
- Saturated Fat: 10g
- Unsaturated Fat: 12g
- Trans Fat: 1g
- Carbohydrates: 30g
- Fiber: 2g
- Protein: 30g
- Cholesterol: 70mg
Keywords: cheeseburger, skillet, comfort food, one-pan meal, easy recipe