emmawhitaker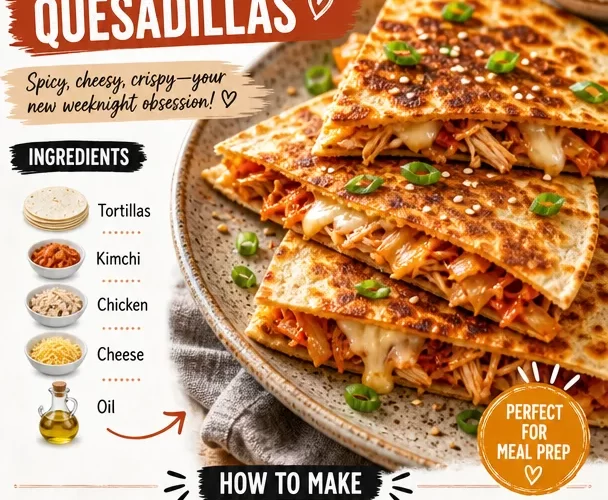
Kimchi Chicken Quesadillas: A Flavorful Fusion Adventure
Hello, my fellow food lovers! I’m Emma Whitaker, and today we’re diving into a delightful culinary experience that marries two cultures in the most delicious way. Yes, you guessed it—we’re talking about Kimchi Chicken Quesadillas! If you’ve ever found yourself stuck in a recipe rut, this dish is the perfect way to shake things up and add some excitement to your weeknight dinners.
Imagine this: it’s a cool evening, and you’re craving something warm, cheesy, and utterly satisfying. Quesadillas are already a hit in many households, but let’s take it a step further by jazzing them up with some tangy, fermented kimchi and juicy chicken. Trust me; this combination will have your taste buds dancing!
What I love most about these Kimchi Chicken Quesadillas is how simple yet rewarding they are. The vibrant, spicy kick from the kimchi and the savory goodness of the chicken pair beautifully with the gooey cheese, all nestled in crispy tortillas. Not only are they perfect for dinner, but they also make amazing snacks or party appetizers. Let’s get cooking, shall we?
Personal Story
I fondly remember the first time I tried kimchi. It was at a friend’s Korean BBQ party. I was a little apprehensive at first; the smell was intense, and the vibrant red color was unlike anything I had experienced. However, as soon as I took that first bite, I was hooked! The addictive spicy-tanginess was a revelation, and I spent the rest of the evening sneaking bites from the shared platter.
Fast forward to my kitchen experimentation days—I decided to incorporate my new-found love for kimchi into one of my favorite comfort foods: quesadillas. I wanted to combine the elements of home cooking that I grew up with, alongside the new flavors I had come to adore. The outcome? A burst of nostalgia with a modern twist, capturing the essence of home while allowing me to explore new culinary ideas. Each quesadilla tells a story, blending tradition with personal creativity, making every bite a celebration of good food and memories.
Ingredients
- Tortillas: The foundation of our quesadillas! I usually go for flour tortillas for their soft texture and pliability, but corn tortillas are a fantastic gluten-free alternative.
- Kimchi: This spicy fermented cabbage is the star of the show. If you can’t find it in stores, you can easily make your own or, for a milder option, substitute with pickled vegetables.
- Chicken: Use cooked shredded chicken for the easiest experience. You can use leftovers from a roast or even store-bought rotisserie chicken! Alternatively, tofu or beans work wonders for a vegetarian option.
- Cheese: A melty cheese like cheddar or Monterey Jack adds that gooey goodness we all love. Feel free to experiment with pepper jack for a spicier kick or a dairy alternative if you’re vegan.
- Oil: A little cooking oil is essential for achieving that beautiful golden-brown crust on your quesadillas. Use olive oil for a healthier option, or go with butter for that extra richness.
Step-by-Step Instructions
-
Prep the Ingredients: Start by gathering all your ingredients. Shred the cooked chicken if you haven’t already. Chop your kimchi into smaller pieces to make it easier to incorporate into the quesadillas. Quick tip: The more finely you chop the kimchi, the more evenly it’ll spread throughout the quesadilla!
-
Heat the Pan: Grab a non-stick skillet and heat it over medium heat. Add a tablespoon of oil and let it warm up. Not too hot—just enough to create a sizzle when you add your quesadilla. A fun fact? If your oil begins to smoke, it’s too hot, and you may need to lower your heat!
-
Assemble the Quesadilla: Place a tortilla in the skillet. Begin layering with a generous handful of shredded cheese, followed by some shredded chicken, and then the chopped kimchi. Don’t forget to top it with more cheese—it acts like glue to hold everything together!
-
Add the Second Tortilla: Carefully place another tortilla on top of your delicious mound. Using a spatula, gently press it down for better contact with the heat. This step might seem small, but it helps the cheese melt evenly and gives you that perfect crispy texture.
-
Cook Until Golden Brown: Let the quesadilla cook for about 3-4 minutes on one side until golden brown. Carefully flip it over once it’s nice and crispy. Cook the other side for another few minutes until it’s as golden as the first side and the cheese is oozy and melted. Chef hack: If you’re worried about flipping, you can slide the quesadilla onto a plate, then invert the skillet on top and flip it right into the pan!
-
Slice and Serve: Remove the quesadilla from the skillet and let it cool for a minute before slicing it into wedges. This helps the cheese set a bit and makes for cleaner cuts! Pro tip: Use a pizza cutter for easy slicing.
Serving Suggestions
Now that your Kimchi Chicken Quesadillas are ready, it’s time to serve them up! I like to plate them with a side of creamy avocado dip or classic sour cream to balance out the spice of the kimchi. Fresh cilantro and lime wedges on the side add an extra zing that brightens the whole dish. For a pop of color, throw on some sliced radishes or a small salad for that fresh crunch!
Recipe Variations
-
Spicy Kimchi Quesadillas: For those who love heat, add some sliced jalapeños or sprinkle in some chili flakes before cooking.
-
Veggie Delight: Load up the quesadilla with sautéed bell peppers, onions, or even mushrooms alongside the chicken for a veggie boost!
-
Cheesy Spinach Twist: Toss in a handful of fresh spinach or kale for some greens that will wilt beautifully—a great way to sneak in some nutrition!
-
Gluten-Free Option: Swap the flour tortillas for corn tortillas to enjoy this delicious fusion without the gluten.
-
Breakfast Quesadilla: Why not make it breakfast? Scramble some eggs, add cheese, and toss in the kimchi for a savory morning treat!
Chef’s Notes
As with all my recipes, there’s a special story behind how these Kimchi Chicken Quesadillas came to be. The first time I made them was a rainy Sunday afternoon with friends. We were trying to use up ingredients in my fridge, and what started as a "throw-it-together" meal turned into an absolute sensation! Everyone was raving, and I realized I’d stumbled upon something magical. Since then, I’ve played around with ingredients and variations, and it’s become a staple in my home.
Cooking is all about experimentation and creating memorable moments, and these quesadillas are a perfect expression of that spirit. Every time I make them, I’m reminded of that creative day in the kitchen, and how the simplest recipes can bring joy and connection.
FAQs and Troubleshooting
-
What should I do if my quesadillas are soggy?
Make sure you’re not overloaded with filling, which can lead to sogginess. Also, ensure your pan is hot enough before cooking. If needed, cook them longer on lower heat to ensure the tortilla crisps up without burning the filling. -
Can I make these quesadillas ahead of time?
Absolutely! You can prepare them ahead and even freeze uncooked quesadillas. Just pop them in the skillet straight from the freezer, but adjust the cooking time slightly longer. -
What if I can’t find kimchi?
No worries! If kimchi is not readily available, try replacing it with pickled cabbage or even sauerkraut for a different flavor profile. -
Can I use a different protein?
Definitely! Ground beef, pork, or even shredded tofu can make fantastic fillings. Just remember to season them well!
Nutritional Info
While every dish isn’t just about numbers, it’s nice to know what we’re working with! Here’s a quick breakdown:
- Calories: Approximately 350 per quesadilla (depending on fillings and cooking methods)
- Protein: Around 25g
- Carbs: Roughly 30g
- Fat: About 15g
In conclusion, Kimchi Chicken Quesadillas are the best of both worlds—a beautiful blend of comfort food and bold flavors that breathe new life into your dinner table. I encourage you to give this recipe a try and explore the wonderful, whimsical world of fusion cuisine. Happy cooking, and may your kitchen adventures be filled with joy and creativity!
PrintKimchi Chicken Quesadillas
A delightful fusion of spicy kimchi and cheesy quesadillas, perfect for weeknight dinners or party appetizers.
- Prep Time: 15 minutes
- Cook Time: 10 minutes
- Total Time: 25 minutes
- Yield: 4 servings 1x
- Category: Main Course
- Method: Pan-Frying
- Cuisine: Korean-Mexican Fusion
- Diet: Pescatarian
Ingredients
- 4 flour tortillas (or corn for a gluten-free option)
- 1 cup kimchi, chopped
- 2 cups cooked shredded chicken
- 1 cup cheddar or Monterey Jack cheese
- 1 tablespoon cooking oil
Instructions
- Prep the Ingredients: Gather all your ingredients. Shred the cooked chicken and chop the kimchi into smaller pieces.
- Heat the Pan: Heat a non-stick skillet over medium heat and add a tablespoon of oil.
- Assemble the Quesadilla: Place a tortilla in the skillet, layer with cheese, chicken, and kimchi, then top with more cheese.
- Add the Second Tortilla: Carefully place another tortilla on top and press down gently.
- Cook Until Golden Brown: Cook for 3-4 minutes, flip, and cook for another few minutes until crispy.
- Slice and Serve: Remove from skillet, let cool, slice into wedges, and enjoy!
Notes
Serve with avocado dip, sour cream, cilantro, and lime for added flavor. Great variations include spicy kimchi, veggie options, or breakfast quesadillas.
Nutrition
- Serving Size: 1 quesadilla
- Calories: 350
- Sugar: 2g
- Sodium: 500mg
- Fat: 15g
- Saturated Fat: 7g
- Unsaturated Fat: 6g
- Trans Fat: 0g
- Carbohydrates: 30g
- Fiber: 3g
- Protein: 25g
- Cholesterol: 70mg
Keywords: quesadillas, kimchi, fusion cuisine, chicken, dinner recipe