Tag: Baking Recipes

  • Lemon Oatmeal Crumble Bars

    Lemon Oatmeal Crumble Bars

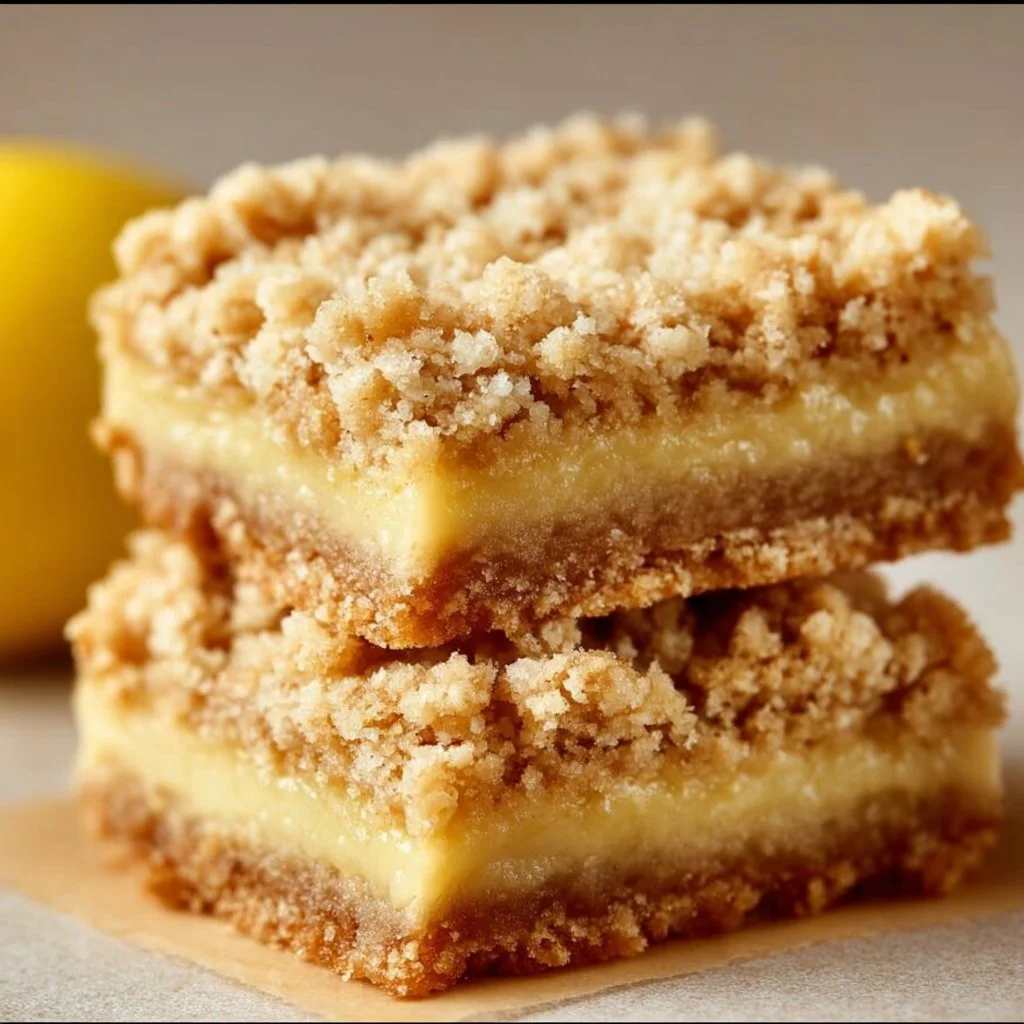
    Lemon Oatmeal Crumble Bars: A Sweet Tangy Delight!

    Hey there, fellow food lovers! 🍋✨ If you’re anything like me, you understand the sheer joy that comes from a bite of something sweet yet tangy. Today, I’m excited to share with you one of my all-time favorite recipes that perfectly marries the bright flavor of lemons with the comforting texture of oats: Lemon Oatmeal Crumble Bars!

    Imagine this: a sunny afternoon, the aroma of fresh lemons wafting through the kitchen, and the sweet anticipation of a delicious treat that invites friends and family to gather around the table. These bars are not just a dessert; they’re a slice of nostalgia, a piece of sunshine, and that little bit of happiness we all deserve in our lives.

    Lemon Oatmeal Crumble Bars are incredibly versatile, making them the perfect companion for any occasion—whether it’s a picnic in the park, a cozy night in front of the TV, or a cheerful brunch gathering. Imagine sinking your teeth into a soft, buttery base, topped with a zesty lemon filling, and finished off with a satisfying crumble. It’s like a warm hug for your taste buds!

    But before we dive into the kitchen, let me tell you a little story about how these delightful bars came to be a cherished part of my recipe collection.


    Personal Story

    A few years ago, I found myself in one of life’s messy but beautiful seasons—a whirlwind of long workdays, forgotten grocery lists, and a growing craving for comfort food. One sunny Saturday, I decided to raid my pantry, which was sporting a collection of oats, some nearly expired lemons, and a bit of sugar that was just begging to be turned into something delightful.

    I could practically hear my grandma’s voice guiding me, reminding me not to waste a single thing. Her old wooden spoon was waiting for its moment in my hand, and off I went, channeling my inner chef. I set out to create something that reflected both the warmth of my childhood and the zest of adulting—hence, the birth of these Lemon Oatmeal Crumble Bars!

    As soon as I pulled them out of the oven, my kitchen was filled with a tangy aroma that immediately whisked me back to the days of baking with my grandma. Sitting on the warm counter, a slice of sunny sweetness found its way into my hands. It was light, tangy, and oh-so-delicious. I couldn’t stop at just one! I invited friends over, and their smiles and satisfied nods became the ultimate stamp of approval.

    Now, every time I whip up a batch, it’s not just about the bars themselves—it’s a celebration of those cozy kitchen memories and the joy of sharing love through food. So, let’s get to it and create some unforgettable Lemon Oatmeal Crumble Bars together!


    Ingredients

    Here’s what you need to whip up these heavenly outdoor-friendly bars:

    • Old-fashioned oats: About 2 cups of these hearty oats create the perfect crumble base. They add texture and chewiness. If you’re gluten-free, just substitute with certified gluten-free oats!

    • All-purpose flour: You’ll need about 1 cup. It serves as the backbone of our crumble. If you’re looking for a gluten-free alternative, almond flour or a 1:1 gluten-free baking mix works great.

    • Brown sugar: ¾ cup to sweeten things up and add a hint of molasses for that rich flavor. Feel free to swap it with coconut sugar if you need a refined sugar-free option.

    • Granulated sugar: About ½ cup to give our lemon filling the sweetness it needs to balance the tartness. You can use honey or maple syrup for a natural sweetener!

    • Unsalted butter: ½ cup (1 stick), melted. This adds flakiness and richness to our crumble. You can also use coconut oil for a dairy-free option.

    • Lemons: You’re going to need 2 large lemons—both the juice and zest! The zest brings so much brightness. If you’re in a pinch, bottled lemon juice can work too, but fresh is always best.

    • Egg: Just one! It binds everything together in our filling. If you need an egg substitute, you can use a flax egg (1 tablespoon flaxseed meal mixed with 2.5 tablespoons water) for a plant-based version.

    • Baking powder: 1 teaspoon to give our bars a light lift.

    • Salt: ½ teaspoon to enhance all those lovely flavors.


    Step-by-Step Instructions

    Now that we have our ingredients lined up, let’s roll up our sleeves and get started on these zesty treats!

    1. Preheat the Oven: First things first, preheat your oven to 350°F (175°C). This is essential for creating that perfect golden crust.

    2. Prepare Your Baking Dish: Grab a 9×9-inch (or 8×8-inch) baking pan and line it with parchment paper, allowing a little overhang on the sides for easy lifting later. A bit of non-stick spray will ensure these bars come out beautifully.

    3. Mix the Dry Ingredients: In a large bowl, combine the old-fashioned oats, flour, brown sugar, granulated sugar, baking powder, and salt. Stir it all together until it looks well-blended. Take a moment to appreciate that nutty, sweet smell!

    4. Add in the Butter: Pour the melted butter into the dry mixture. Using a fork or your hands, mix until everything clumps together and resembles coarse crumbs. Leave some chunks for that lovely crumble texture!

    5. Set Aside the Crumble Mixture: Scoop out about 1.5 cups of this mixture and set it aside in a small bowl. This will be our crumble topping.

    6. Press the Crust: Using the remaining mixture, press it evenly into the bottom of your prepared baking dish, ensuring a firm layer that will hold our luscious filling.

    7. Make the Lemon Filling: In another bowl, whisk together the egg, lemon juice, lemon zest, and granulated sugar (the ½ cup you set aside earlier) until fully combined. This is where the magic happens; the aroma will make it hard to resist tasting!

    8. Pour it Over the Crust: Pour this sunny lemon mixture over the pressed crust. Don’t worry if it looks a bit thin; it’ll set beautifully when baked.

    9. Top with Crumble: Gently sprinkle the reserved crumble mixture over the lemon filling. It doesn’t have to be perfect—some gaps are totally fine! This will create those flaky, crispy bits we love.

    10. Bake to Perfection: Pop your dish into the preheated oven and bake for 30-35 minutes, or until the top is lightly golden and the filling is just set. You’ll know they’re ready when the smell wafts through your home, making everyone think dinner is done!

    11. Cool and Slice: Once ready, remove the bars from the oven and let them cool in the pan for about 10 minutes. Then, lift them out using the parchment overhang, place them on a wire rack, and allow them to cool completely before slicing into those delicious squares.


    Serving Suggestions

    As these delightful bars cool, you might find yourself daydreaming about how to serve them. To really elevate your presentation and oh-so-fresh flavors, here are a few of my favorite serving suggestions:

    1. Dust with Powdered Sugar: Before serving, lightly dust the tops with powdered sugar for a dreamy, delicate finish. It’s such a simple touch that goes a long way in making them look even more enticing!

    2. Fresh Berries: Pair these bars with a side of fresh berries like strawberries, blueberries, or raspberries. Their tartness complements the sweetness of the bars perfectly.

    3. A Dollop of Whipped Cream: If you want to turn these lemon oat bars into an elevated dessert, add a dollop of freshly whipped cream or a scoop of vanilla ice cream on the side. Talk about indulgence!

    4. Herbal Garnish: To add an extra touch, garnish with fresh mint leaves or basil. The green notes can accentuate the lemon flavor and make your dessert look extra fancy!


    Recipe Variations

    Feeling a little adventurous? Here are some creative twists to make these bars your own:

    1. Blueberry Lemon Oat Bars: Add 1 cup of fresh or frozen blueberries to the lemon filling. The combinations of flavors will make your taste buds dance!

    2. Zesty Ginger: Add a teaspoon of grated ginger to the lemon filling for a spicy kick that pairs beautifully with the tartness.

    3. Lemon Coconut Crumble Bars: Mix shredded unsweetened coconut into the crumble for an added texture and tropical vibe. You could also use coconut oil instead of butter for a dairy-free option!

    4. Maple Lemon Crumble Bars: Swap out granulated sugar with maple syrup for a rich, earthy sweetness. Note that you may need to reduce some of the liquid in the filling to account for the additional moisture.

    5. Cherry Lemon Oat Bars: Swap blueberries for fresh cherries! Either pitted and halved sour cherries or sweet ones will work wonders.


    Chef’s Notes

    Making these Lemon Oatmeal Crumble Bars has become a cherished ritual in my kitchen. I often find myself indulging in a little experimentation! One time, I even added some crushed almond in the crumble—wow, did that speed things up in the flavor department. These bars are incredibly forgiving; if you’re missing an ingredient, you can often find a clever substitute that turns out just as delightful.

    And, let’s face it—sometimes they don’t even last the day in my household! Friends and family gather, stories are shared, and everyone gets a slice of joy. Each batch seems to have its own unique character, thanks to everything from the juiciness of the lemons to the exact sweetness of that particular batch of brown sugar. It’s all these little surprises that truly keep my heart in the kitchen.


    FAQs and Troubleshooting

    Q: Can I make these bars ahead of time?
    A: Absolutely! These bars keep well in an airtight container in the fridge for about a week. Just be sure to let them cool completely before storing.

    Q: What if my bars don’t seem to set as they should?
    A: This can be due to a few factors—make sure to use fresh lemons (not bottled juice) and check that you used the correct egg size. You may have also underbaked them; if they jiggle too much, give them a few more minutes.

    Q: How can I tell when they’re done baking?
    A: You’re looking for a light golden brown top, and the lemon filling should be set, not jiggly. A toothpick inserted into the center should come out clean.

    Q: Can I freeze the leftover bars?
    A: Yes! Just make sure they are fully cooled, cut them into squares, and wrap them tightly in plastic wrap, followed by aluminum foil, before freezing. When you’re ready to enjoy, let them thaw in the fridge overnight!


    Nutritional Info

    Each Lemon Oatmeal Crumble Bar contains approximately:

    • Calories: 180
    • Total Fat: 7g
    • Saturated Fat: 4g
    • Cholesterol: 30mg
    • Sodium: 80mg
    • Total Carbohydrates: 26g
    • Dietary Fiber: 2g
    • Sugars: 10g
    • Protein: 3g

    These bars are a tasty treat, and while they’re not necessarily a "health food," they’re a much better option than a store-bought cookie or dessert. Enjoying them in moderation is key!


    Final Thoughts

    There you have it, friends! A slice of sunshine filled with nostalgic flavors that brings warmth to kitchens everywhere. Let these Lemon Oatmeal Crumble Bars be a reminder that delicious treats don’t have to be complicated. Whether it’s a cozy gathering with friends or a quiet evening by yourself with a warm cup of tea, these bars are the perfect treat for any occasion.

    So, the next time you need a pick-me-up or want to impress your friends, don’t hesitate to whip up a batch of these lovely bars. Cook with joy, share with love, and remember—every bite is an opportunity to connect with those you adore. Happy baking, and as always, let’s make something delicious together! 🍋✨


    I can’t wait to hear how your Lemon Oatmeal Crumble Bars turn out! Don’t forget to share your stories and pics with our Tasty Chow community!

    Print

    Lemon Oatmeal Crumble Bars

    Delicious bars combining the bright flavor of lemons with a comforting oatmeal crumble.

    • Author: emmawhitaker
    • Prep Time: 15 minutes
    • Cook Time: 35 minutes
    • Total Time: 50 minutes
    • Yield: 16 servings 1x
    • Category: Dessert
    • Method: Baking
    • Cuisine: American
    • Diet: Vegetarian

    Ingredients

    Scale
    • 2 cups old-fashioned oats
    • 1 cup all-purpose flour
    • ¾ cup brown sugar
    • ½ cup granulated sugar
    • ½ cup unsalted butter, melted
    • 2 large lemons (juice and zest)
    • 1 egg
    • 1 teaspoon baking powder
    • ½ teaspoon salt

    Instructions

    1. Preheat your oven to 350°F (175°C).
    2. Prepare a 9×9-inch baking pan with parchment paper.
    3. Mix the old-fashioned oats, flour, brown sugar, granulated sugar, baking powder, and salt in a large bowl.
    4. Add the melted butter and combine until it resembles coarse crumbs.
    5. Set aside 1.5 cups of the crumble mixture for topping.
    6. Press the remaining mixture into the bottom of the baking pan.
    7. Make the lemon filling by whisking together the egg, lemon juice, lemon zest, and granulated sugar.
    8. Pour the lemon mixture over the crust.
    9. Top with the reserved crumble mixture.
    10. Bake for 30-35 minutes, until golden.
    11. Cool for 10 minutes before transferring to a wire rack.

    Notes

    Dust with powdered sugar or serve with fresh berries for a delightful finish.

    Nutrition

    • Serving Size: 1 bar
    • Calories: 180
    • Sugar: 10g
    • Sodium: 80mg
    • Fat: 7g
    • Saturated Fat: 4g
    • Unsaturated Fat: 2g
    • Trans Fat: 0g
    • Carbohydrates: 26g
    • Fiber: 2g
    • Protein: 3g
    • Cholesterol: 30mg

    Keywords: lemon dessert, crumble bars, oatmeal bars, baking, sweet treats

    Did you make this recipe?

    Share a photo and tag us — we can’t wait to see what you’ve made!

  • Banana Brownies

    Banana Brownies

    Indulge in Decadence: The Perfect Banana Brownies Recipe!

    Hey there, fellow food lover! 🍌 If you’ve ever sat with a few overripe bananas wondering what to do with them, you’re in for a real treat—because today, we’re diving into one of the most delightful concoctions you can whip up: Banana Brownies!

    Now, let’s be real. Brownies are a cherished classic in the baking universe—rich, chocolatey, and utterly irresistible. But mix in some sweet, ripe bananas, and you have a recipe that takes everything to the next level. These Banana Brownies not only cut down on the sugar (hello, natural sweetness!) but also bring a moist, fudgy texture that will make your heart sing and your taste buds dance!

    Imagine a cozy afternoon where the comforting smell of chocolate wafts through your house, wrapping you in a warm embrace. And if you’re anything like me, you’ll find yourself sneaking bites straight from the pan—because let’s be honest, there’s nothing quite like the gooeyness of a freshly baked brownie.

    This recipe is simple, fun, and a wonderful way to use up those bananas that are a bit too ripe for your morning smoothie. Plus, it’s an excuse to indulge in dessert that feels just a tad healthier. So, grab your apron and let’s embark on this delicious journey together!

    Personal Story

    Growing up, my grandmother always had a magical knack for turning simple ingredients into gastronomic masterpieces. I can still picture her bustling about the kitchen, the scents of vanilla and chocolate blending with those of freshly baked banana bread. It was during one of my weekend visits that she introduced me to the concept of banana brownies.

    One particularly rainy afternoon, she pulled out a bowl of mushy bananas and said with a twinkle in her eye, “Let’s make something sweet!” I watched in awe as she smashed the bananas, stirring in chocolate batter, while regaling me with tales of her own baking adventures. We ended up creating a recipe that not only satisfied our sweet tooth but also brought laughter and warmth to our cozy kitchen. The best part? Those brownies were so gooey and indulgent, they felt like a warm hug after a long day.

    Let’s recreate that blissful memory together—trust me, your own kitchen can feel just as magical!

    Ingredients

    Here’s the lineup for your Banana Brownies! Trust me; you’ll want to gather these delicious ingredients before we get started!

    • 2 ripe bananas: The riper, the better! They should be spotty and soft for maximum sweetness. If you don’t have ripe bananas, you can speed the ripening process by placing them in a brown paper bag overnight.

    • 1/2 cup unsalted butter: This gives our brownies that rich, fudgy texture. If you’re looking for a lighter option, feel free to substitute with coconut oil, which will add a subtle tropical flavor.

    • 1 cup granulated sugar: While the bananas provide natural sweetness, the sugar helps achieve that perfect brownie texture. For a healthier alternative, you could try using coconut sugar or a sugar substitute like Stevia.

    • 2 large eggs: Eggs are essential here; they bind everything together, creating a moist brownie. If you’re vegan or egg-free, using a flaxseed meal or applesauce can work as a substitute (1 tablespoon of flaxseed meal + 2.5 tablespoons of water for each egg).

    • 1 teaspoon vanilla extract: This adds depth to our brownies. Always opt for pure vanilla extract for the best flavor, but in a pinch, imitation vanilla works too.

    • 1/2 cup all-purpose flour: While this is the base for our brownies, you can swap in whole wheat flour or almond flour for a different flavor profile and texture.

    • 1/2 cup unsweetened cocoa powder: The star ingredient, giving those brownies their deep chocolaty essence. Make sure to sift to avoid lumps—nobody likes a lumpy brownie!

    • 1/4 teaspoon baking soda: This will help our brownies rise, giving them the perfect chewiness. Baking powder could also be used here, but make sure to double the quantity.

    • 1/4 teaspoon salt: A pinch of salt enhances flavors beautifully, balancing the sweetness of the brownies. If you’re using salted butter, feel free to skip this ingredient.

    Let’s roll up those sleeves and dive into the baking fun!

    Step-by-Step Instructions

    We’re ready to get mixing! Here’s how to transform those simple ingredients into mouthwatering Banana Brownies.

    1. Preheat Your Oven: First things first! Preheat your oven to 350°F (175°C). If you forget this step, don’t worry; just pop those brownies in when your oven is ready to go—though I promise they’ll bake better if you’re patient!

    2. Prepare Your Baking Dish: While the oven warms up, grab an 8×8-inch baking pan (or a similar size). Grease it with a touch of butter or line it with parchment paper for easy removal later. Trust me; you’ll want to do this unless you’re feeling adventurous!

    3. Smash the Bananas: In a mixing bowl, mush those ripe bananas until they are mostly smooth. I like to use a fork or potato masher for this—channel your inner child! This step is key to creating that elegant fudgy texture. (A few small lumps add character!)

    4. Melt the Butter: In a microwave-safe bowl, melt the butter until it’s just about liquid. (Around 30-40 seconds should do the trick.) Allow it to cool down slightly, so it doesn’t cook your eggs when mixed together.

    5. Mix Wet Ingredients: In your bowl with the mashed bananas, stir in the melted butter, eggs, and vanilla extract. Whisk everything together until well combined. You want a nice smooth mixture—this is where the magic begins!

    6. Combine Dry Ingredients: In a separate bowl, whisk together the flour, cocoa powder, baking soda, and salt. Make sure you’re doing this step separately to avoid flour lumps! Gradually add this dry mix to your wet mixture, folding it with a spatula until just combined. That’s crucial—overmixing can lead to tough brownies, and nobody wants that!

    7. Pour and Spread: Pour the brownie batter into your prepared baking dish, using a spatula to spread it evenly. Let’s get every nook and cranny filled with rich chocolate goodness!

    8. Bake: Pop those babies into the preheated oven and let them bake for about 20-25 minutes. You’ll know they’re done when a toothpick inserted into the center comes out with a few moist crumbs (not wet batter!).

    9. Cool and Cut: Once baked, remove the brownies from the oven and let them cool in the pan for at least 15 minutes. Lift them out using the parchment paper if you lined your pan. Now, slice them into squares, but be warned: they’re best served warm!

    Serving Suggestions

    Oh, the fun doesn’t stop at the baking! Here are some creative serving ideas to take your Banana Brownies from delicious to WOW:

    • A Scoop of Ice Cream: Serve a warm brownie topped with your favorite ice cream—vanilla is a classic choice, but hey, why not banana or chocolate for a double banana delight?

    • Drizzle of Chocolate Sauce: For the ultimate indulgence, drizzle melted chocolate or hot fudge over your brownie before serving. It adds that extra luxurious touch!

    • Whipped Cream and Fresh Berries: Fancy it up with a dollop of whipped cream and a handful of berries. The tartness of the berries complements the sweetness of the brownies beautifully!

    • Sprinkle of Nuts: If you’re a fan of texture, sprinkle some chopped walnuts or pecans on top. They add a crunch that elevates each bite.

    • Coconut Flakes: For a tropical vibe, sprinkle toasted coconut flakes on top. It adds both flavor and a visually pleasing touch.

    Recipe Variations

    Feeling adventurous? Here are some fun variations and flavor twists you can try:

    1. Nutty Banana Brownies: Stir in 1/2 cup of chopped nuts, like walnuts or pecans, for an extra crunch that contrasts beautifully with the soft brownie texture.

    2. Hint of Spice: Add a teaspoon of cinnamon or nutmeg to the batter for a warm, cozy flavor that’s perfect for fall!

    3. Chocolate Chip Extravaganza: Stir in 1/2 cup of chocolate chips into the batter right before pouring it into the pan. Double the chocolate means double the deliciousness!

    4. Peanut Butter Swirl: Take 1/4 cup of creamy peanut butter and gently swirl it into the brownie batter before baking. This creates a delightful twist that’s a crowd-pleaser!

    5. Dietary-Friendly: For a healthier version, use almond flour instead of all-purpose flour and coconut oil or applesauce as a butter substitute. Reduce sugar to keep things light while still enjoying a sweet treat!

    Chef’s Notes

    Oh, the stories I could share! I remember the first time I served these Banana Brownies at a family gathering. Initially, everyone was skeptical. “Bananas in brownies? Really?” But once those brownies made their way around the table, you could practically hear the collective “OMG” of delight. They disappeared in minutes!

    This recipe has gone through several evolutions over the years. At one point, I even made mini versions in muffin tins for a bite-sized treat. And trust me—those were a hit too! What I love most about baking is how much room there is for creativity. So don’t feel confined to my guidelines; let your inner chef shine!

    FAQs and Troubleshooting

    1. What if my brownies are too dry?
      Don’t worry; it happens to the best of us! Next time, cut back on the baking time by a minute or two. Remember, they continue to cook a little after you take them out!

    2. How do I store leftover brownies?
      Keep them in an airtight container at room temperature for up to 3 days. You can also freeze them for later enjoyment—just wrap them tightly in plastic wrap!

    3. Can I use frozen bananas?
      Absolutely! Just make sure to thaw and drain excess moisture before using them for the best texture.

    4. How do I know when they are done?
      Check them a couple of minutes before the baking time is up. The toothpick test is key: it should come out with a few moist crumbs but not wet batter.

    Nutritional Info

    (Per serving, assuming 16 brownies from this recipe):

    • Calories: 157
    • Protein: 2g
    • Fat: 7g
    • Carbohydrates: 22g
    • Fiber: 1g
    • Sugar: 10g

    These delightful brownies not only satisfy your sweet cravings, but they also offer a bit of nourishment from the bananas, making them a wholesome treat (in moderation, of course!).

    Final Thoughts

    So there you have it, dear food lover! Banana Brownies are not just a recipe; they’re a delightful way to bring joy and warmth to your kitchen. Every bite is a reminder of the simple pleasures of life—good food, good friends, and sweet memories.

    I can’t wait for you to try this recipe! Whether you’re baking for yourself, for a loved one, or just to treat your taste buds, these Banana Brownies are sure to become a new favorite. So go ahead, don that apron, get a little messy, and let’s chow down on some happiness!

    Peace, love, and brownies,
    — Emily 🍫

    Print

    Banana Brownies

    Deliciously moist and fudgy Banana Brownies made with ripe bananas, perfect for using up overripe fruit while indulging your sweet tooth.

    • Author: emmawhitaker
    • Prep Time: 15 minutes
    • Cook Time: 25 minutes
    • Total Time: 40 minutes
    • Yield: 16 servings 1x
    • Category: Dessert
    • Method: Baking
    • Cuisine: American
    • Diet: Vegetarian

    Ingredients

    Scale
    • 2 ripe bananas
    • 1/2 cup unsalted butter
    • 1 cup granulated sugar
    • 2 large eggs
    • 1 teaspoon vanilla extract
    • 1/2 cup all-purpose flour
    • 1/2 cup unsweetened cocoa powder
    • 1/4 teaspoon baking soda
    • 1/4 teaspoon salt

    Instructions

    1. Preheat your oven to 350°F (175°C).
    2. Prepare an 8×8-inch baking pan, greasing it or lining it with parchment paper.
    3. Smash the ripe bananas in a mixing bowl until mostly smooth.
    4. Melt the butter in a microwave-safe bowl until liquid and let it cool slightly.
    5. Mix the melted butter, eggs, and vanilla into the mashed bananas, whisking until smooth.
    6. Combine the flour, cocoa powder, baking soda, and salt in a separate bowl, then add to the wet mixture and fold until just combined.
    7. Pour the batter into the prepared pan, spreading it evenly.
    8. Bake for 20-25 minutes or until a toothpick comes out with a few moist crumbs.
    9. Cool in the pan for at least 15 minutes before cutting into squares.

    Notes

    For extra richness, consider adding chocolate chips or nuts to the batter. Adjust baking time if you prefer gooier brownies.

    Nutrition

    • Serving Size: 1 brownie
    • Calories: 157
    • Sugar: 10g
    • Sodium: 40mg
    • Fat: 7g
    • Saturated Fat: 4g
    • Unsaturated Fat: 3g
    • Trans Fat: 0g
    • Carbohydrates: 22g
    • Fiber: 1g
    • Protein: 2g
    • Cholesterol: 30mg

    Keywords: brownies, banana brownies, dessert, chocolate dessert, baking with bananas

    Did you make this recipe?

    Share a photo and tag us — we can’t wait to see what you’ve made!