Tag: chocolate treats

  • Healthy Banana Brownies

    Healthy Banana Brownies

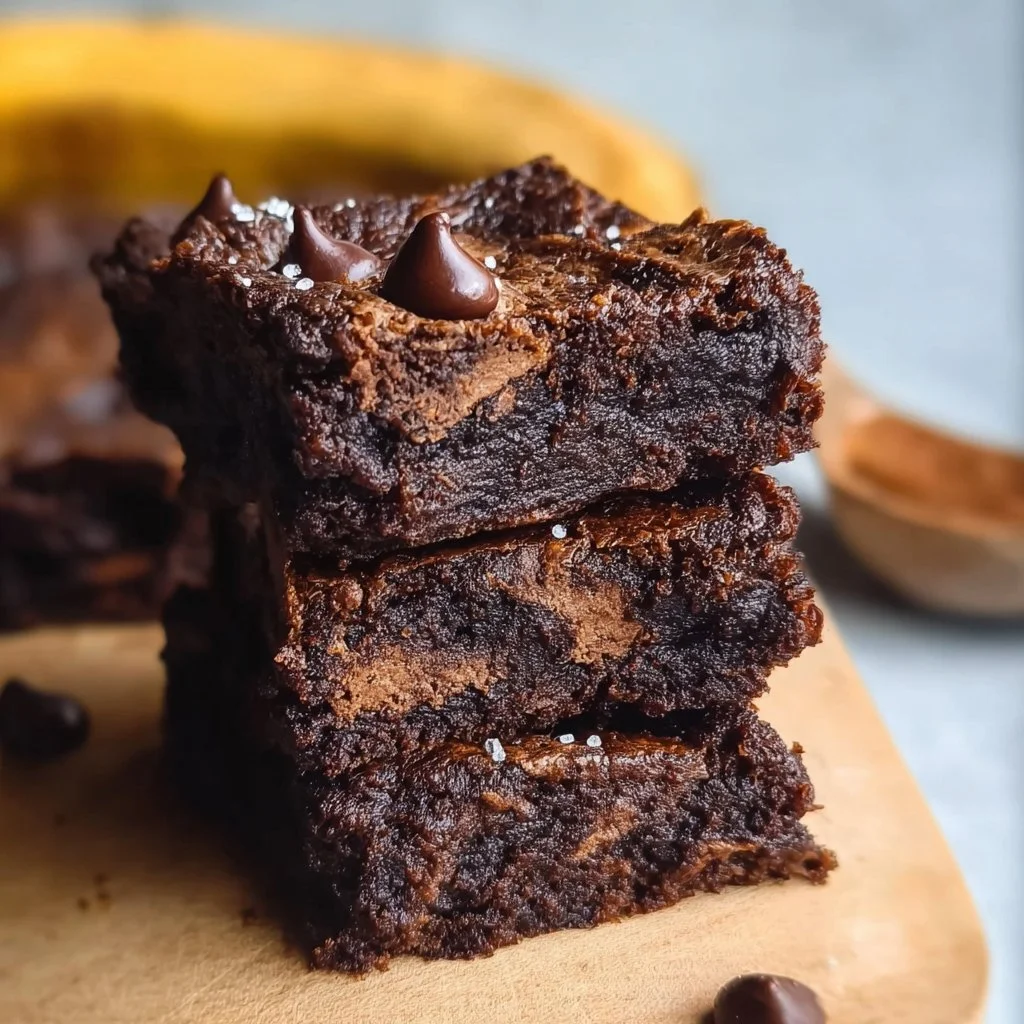
    Healthy Banana Brownies: The Sweet Treat You’ve Been Waiting For!

    Hey there, fellow food lover! 🎉 Are you ready to indulge without the guilt? If you’re anything like me, you might have a soft spot for brownies. They’re rich, fudgy, and oh-so-comforting, but let’s be real—sometimes a decadent dessert isn’t the healthiest choice. That’s where these Healthy Banana Brownies come in, and trust me: they’re a game changer!

    Imagine taking all the greatness of a classic brownie but giving it a health-conscious twist so you can feel good about every delicious bite. This recipe is packed with ripe bananas, cocoa, and just the right touch of sweetener. The end result? A scrumptious treat that’s great for an afternoon snack, a post-workout pick-me-up, or even a late-night sweet tooth satisfaction!

    In this blog post, we’ll walk through everything you need to know to whip up these delightful brownies, complete with some of my personal stories, tips and tricks, and variations to keep things exciting. So grab your apron, put on your favorite tunes, and let’s get cooking!


    My Sweet Banana Memory

    Ah, bananas and brownies—a combo I’m absolutely obsessed with! My love for sunny bananas goes all the way back to my childhood days. I remember whenever we had overripe bananas in the house, my Grandma would whip up her famous banana bread. I’d sit at the kitchen table, that delicious aroma wafting through the air, watching her glide around the kitchen like a culinary wizard.

    One day, I decided I wanted to keep that same promise of deliciousness but put a twist on it. Brownies were my favorite guilty pleasure, so I thought: Why not combine my childhood nostalgia with a dessert I adore? It was a slam-dunk idea that turned into these luscious Healthy Banana Brownies. Each bite takes me back to those sunlit kitchen mornings, but now—with the bonus of being a bit healthier!


    Ingredients

    Before we dive into the baking, let’s take a look at the ingredients you’ll need to create these mouthwatering brownies. I’ll share a few chef insights along the way, so you’ll feel like a pro in your kitchen!

    • Ripe Bananas (2 large)

      • Look for bananas with lots of brown spots. The riper, the sweeter! If you’re short on time, you can microwave unripe bananas for about 30 seconds to soften them up.
    • Cocoa Powder (½ cup)

      • Unsweetened cocoa powder will give your brownies a rich, chocolaty flavor. If you prefer a lighter taste, you can use Dutch-processed cocoa for a milder profile.
    • Almond Flour (1 cup)

      • Great for keeping things gluten-free and adding a nutty flavor. If you don’t have almond flour, you can substitute it with whole wheat flour or oat flour, though the texture will slightly change.
    • Maple Syrup (⅓ cup)

      • This natural sweetener adds depth and moisture. You can swap it with honey or agave syrup, but keep in mind, they have slightly different sweetness levels. Adjust accordingly!
    • Eggs (2 large)

      • Egg act as a binder and provides structure. For a vegan version, you can use unsweetened applesauce (¼ cup per egg).
    • Baking Soda (1 tsp)

      • This helps the brownies rise just enough to achieve that perfect fudginess.
    • Vanilla Extract (1 tsp)

      • A must for enhancing flavors! If you want to switch it up, you can use almond extract for a different depth of flavor.
    • Salt (¼ tsp)

      • A little salt enhances sweetness, so don’t skip it! You can use sea salt or kosher salt based on what you have on hand.

    Step-by-Step Instructions

    Ready to bake your new favorite healthy treat? Let’s get started!

    1. Preheat Your Oven: Set it to 350°F (175°C). This is super important for getting that perfect bake. A nicely preheated oven sets the stage for rising and fluffiness.

    2. Prep Your Dish: Grab an 8×8-inch baking pan and line it with parchment paper or lightly grease it. This way, your brownies will pop out easily, and nobody wants sticky brownies stuck to the bottom!

    3. Mash Those Bananas: In a large bowl, mash your ripe bananas until smooth. Use a fork or a potato masher. The more mashed they are, the sweeter your brownies will taste!

    4. Mix Your Wet Ingredients: Into the mashed bananas, add in your eggs, maple syrup, and vanilla extract. Whisk until everything is well combined. This is your flavor foundation!

    5. Combine Dry Ingredients: In a separate bowl, whisk together the cocoa powder, almond flour, baking soda, and salt. Doing this separately helps distribute the leavening agents evenly throughout your brownies.

    6. Fold Together: Gradually add the dry ingredients to the wet mixture, stirring gently. Careful not to overmix; we’re aiming for a gooey texture! If you’re craving some texture, fold in some walnuts or dark chocolate chips at this stage.

    7. Pour into Baking Dish: Go ahead and pour your brownie batter into the prepared baking dish, smoothing it out with a spatula for an even bake.

    8. Bake: Pop your brownies into the oven and let them bake for about 20-25 minutes, or until a toothpick comes out clean (or with just a few crumbs!). The edges will be set, but the center should still be fudgy.

    9. Cool Down: A crucial step! Let the brownies cool in the pan for about 10 minutes, then remove them using the parchment paper (if you used it) and transfer them to a wire rack to cool completely. This wait is totally worth it!

    10. Slice and Serve: Once cooled, slice into delicious squares and feast your eyes on that fudgy goodness!


    Serving Suggestions

    These Healthy Banana Brownies are fantastic on their own, but let’s jazz things up a little! Here are some serving suggestions to elevate your brownie experience:

    • With a Scoop of Ice Cream: Dark chocolate or vanilla ice cream adds a delightful creaminess that contrasts beautifully with the dense brownie texture.

    • Drizzle of Nut Butter: A drizzle of almond or peanut butter adds richness and healthy fats. Plus, it complements the banana flavor so well!

    • Fresh Berries on Top: Add a handful of fresh strawberries or raspberries for a burst of freshness and tartness that brightens every bite.

    • Sprinkle of Sea Salt: For a sweet-salty combo that will have you swooning, sprinkle a tiny bit of flaky sea salt on top just before serving.


    Recipe Variations

    Feeling adventurous? Here are some creative twists to keep your Healthy Banana Brownies fresh and exciting:

    1. Nutty Delight: Add chopped nuts, such as pecans or walnuts, into the brownie batter for a crunchy texture contrast.

    2. Coconut Chocolate Brownies: Incorporate unsweetened shredded coconut into the batter for a tropical vibe, and top with a sprinkle of coconut before baking.

    3. Minty Fresh: Add a few drops of peppermint extract for a delicious mint chocolate twist—perfect for after-dinner treats!

    4. Zesty Orange: A hint of orange zest in the batter brightens the chocolate flavor and adds a lovely citrus note.

    5. Spicy Kick: Add a pinch of chili powder or cayenne for a little heat! It complements chocolate beautifully and will surprise your taste buds.


    Chef’s Notes

    These Healthy Banana Brownies have evolved with me over time; what started as a simple idea in my kitchen has turned into an absolute fan favorite—trust me, kiddos and adults alike devour them! I remember the first time I brought a batch to a picnic. I was nervous because I had warned everyone they were "healthy." But wouldn’t you know, they were the first thing to disappear!

    Also, this recipe has proven to be incredibly forgiving; let’s say you forgot to get almond flour and just had some old whole wheat flour lying around—that works too! Cooking and baking should always be an adventure, so don’t hesitate to experiment!


    FAQs and Troubleshooting

    Got questions? Let’s address some common ones you might have while preparing your Healthy Banana Brownies:

    1. My brownies are dry. What did I do wrong?

    • Overbaking is the typical culprit! Make sure to check them with a toothpick at around 20 minutes. If it comes out clean but not dry, you’re golden.

    2. Can I double this recipe?

    • Absolutely! Just use a 9×13-inch pan and keep an eye on the baking time; it might need an extra 5–10 minutes.

    3. How do I store leftovers?

    • Keep them in an airtight container at room temperature for about 2-3 days or refrigerated for up to a week. You can also freeze them for a later treat—just ensure they are tightly wrapped!

    4. Can I make them vegan?

    • Yes! Substitute the eggs with unsweetened applesauce, and you’re good to go. Make sure your maple syrup is vegan-friendly as well!

    Nutritional Info

    While indulging in something sweet, it’s always helpful to know what you’re getting nutritionally. Here’s a rough estimate per serving (assuming 12 servings):

    • Calories: 100 kcal
    • Protein: 2g
    • Carbohydrates: 20g
    • Sugar: 5g
    • Fat: 3g
    • Fiber: 3g

    These Healthy Banana Brownies pack a punch of nutrients, thanks to the bananas and almond flour, making them a guilt-free option that you can enjoy without any fuss!


    Final Thoughts

    There you have it—your ultimate guide to creating scrumptious Healthy Banana Brownies! Whether you’re whipping these up for a party, a cozy night in, or just to satisfy your sweet tooth, I’m sure they’ll become a treasured staple in your home.

    Cooking, for me, is more than just following a recipe—it’s about the memories we make and the love we share through food. I hope these brownies bring joy to your kitchen as much as they have for mine. Don’t forget to share the love—send a batch to a friend, or better yet, invite them over to bake together; because nothing says love like a sweet treat made with care.

    So go on! Get those bananas mashing, stir up some chocolate goodness, and say hello to your new favorite guilt-free dessert! Happy baking! 🍌❤️

    Print

    Healthy Banana Brownies

    Indulge in these Healthy Banana Brownies, a guilt-free twist on a classic treat, packed with ripe bananas and cocoa for a deliciously fudgy dessert.

    • Author: emmawhitaker
    • Prep Time: 10 minutes
    • Cook Time: 25 minutes
    • Total Time: 35 minutes
    • Yield: 12 servings 1x
    • Category: Dessert
    • Method: Baking
    • Cuisine: American
    • Diet: Vegetarian

    Ingredients

    Scale
    • 2 large Ripe Bananas
    • ½ cup Cocoa Powder
    • 1 cup Almond Flour
    • ⅓ cup Maple Syrup
    • 2 large Eggs
    • 1 tsp Baking Soda
    • 1 tsp Vanilla Extract
    • ¼ tsp Salt

    Instructions

    1. Preheat your oven to 350°F (175°C).
    2. Prep an 8×8-inch baking pan with parchment paper or grease it.
    3. Mash the ripe bananas in a large bowl until smooth.
    4. Mix in eggs, maple syrup, and vanilla extract until well combined.
    5. Combine the dry ingredients in a separate bowl: cocoa powder, almond flour, baking soda, and salt.
    6. Fold the dry ingredients into the wet mixture gently.
    7. Pour the brownie batter into the prepared baking dish and smooth it out.
    8. Bake for 20-25 minutes or until a toothpick comes out clean.
    9. Cool in the pan for 10 minutes before transferring to a wire rack.
    10. Slice into squares and serve.

    Notes

    For a vegan version, substitute eggs with unsweetened applesauce. Store leftovers in an airtight container or freeze for up to a week.

    Nutrition

    • Serving Size: 1 serving
    • Calories: 100
    • Sugar: 5g
    • Sodium: 80mg
    • Fat: 3g
    • Saturated Fat: 0.5g
    • Unsaturated Fat: 2.5g
    • Trans Fat: 0g
    • Carbohydrates: 20g
    • Fiber: 3g
    • Protein: 2g
    • Cholesterol: 0mg

    Keywords: brownies, banana, healthy dessert, gluten-free, guilt-free treat

    Did you make this recipe?

    Share a photo and tag us — we can’t wait to see what you’ve made!

  • No-bake Chocolate Oatmeal Cookies

    No-bake Chocolate Oatmeal Cookies

    No-Bake Chocolate Oatmeal Cookies: A Sweet Journey Without the Oven

    Hey there, fellow food lovers! 👋 If there’s one thing I adore more than whipping up a mouthwatering meal, it’s the thrill of discovering a no-bake recipe that ticks all the boxes for ease and flavor. Today, I’m ecstatic to share with you the ultimate sweet treat: No-Bake Chocolate Oatmeal Cookies! Picture this: a chewy, chocolatey delight that comes together in just a few minutes, requires no oven, and promises to bring smiles to every cookie lover’s face.

    These cookies are a dream come true for busy weeknights, last-minute cravings, or even a fun afternoon baking project with the kids. The pairing of rich cocoa and heart-healthy oats creates a treat that not only satisfies your sweet tooth but also packs a bit of nutritional punch. I mean, who wouldn’t want a cookie that feels a tad virtuous?

    Now, I remember the first time I made these delicious no-bake cookies; I was a teenager experimenting in the kitchen. My mom had a busy schedule, and I wanted to surprise her with a sweet treat after school. I rummaged through our pantry, found some oats, sugar, cocoa powder, and peanut butter (always a staple in our home), and voila! A frenzy of mixing, stirring, and chilling resulted in what can only be described as a moment of pure bliss. As soon as I took that first bite, I knew I had struck culinary gold!

    Join me as we dive into the world of no-bake chocolate oatmeal cookies. Grab your apron, roll up your sleeves, and let’s get to creating something irresistibly delicious together!

    Personal Story

    It was one of those late afternoons after school when I had a light bulb moment — a full-on experiment I was determined to tackle! The kitchen was my playground, and I was ready to create something magical. I vividly recall grabbing a mixing bowl, dumping in some oats, and pouring in that luscious, gooey peanut butter. As a teenager, the joy of mixing ingredients and tasting along the way felt like discovering a secret recipe; to this day, I can’t help but chuckle at how messy I got in the process!

    I remember the satisfaction on my mom’s face as she walked into the kitchen to find me proudly presenting my no-bake cookies on a colorful plate. One bite in, and her eyes lit up! The delightful combination of crunchy oats, rich chocolate, and creamy peanut butter had won her over completely. That day, I learned that cooking is not just about the food itself—it’s about the heartfelt moments and memories created around the dining table. I’ve carried this experience into my culinary journey, always hoping to evoke those same warm feelings with my recipes.

    Ingredients

    Alright, let’s gather our ingredients! Here’s what you’ll need to whip up these easy No-Bake Chocolate Oatmeal Cookies:

    • 2 cups old-fashioned oats
      These oats give the cookies their chewy texture. They absorb moisture beautifully, so you end up with a delightful crunch. If you’re in a pinch, quick oats will work but may give a slightly different texture.

    • 1 cup creamy peanut butter
      The star of our show! Peanut butter adds richness and binds the cookies together. If you have nut allergies, feel free to substitute with sunflower seed butter or almond butter for a nut-free version!

    • 1 cup granulated sugar
      This sweet, luscious sugar brings all the flavors together. For a healthier option, consider coconut sugar or even maple syrup (though with syrup, you may need to adjust the dry ingredients slightly to maintain texture).

    • 1/2 cup unsweetened cocoa powder
      The magical ingredient that turns these cookies into a chocolaty delight! For a sweeter taste, try using Dutch-processed cocoa powder.

    • 1/2 cup milk (or dairy-free milk)
      Adding a bit of milk helps blend everything nicely. Almond milk, coconut milk, or oat milk works beautifully too!

    • 1 teaspoon vanilla extract
      A splash of vanilla adds depth to the flavors. If you want to elevate your game, try infusing it with a touch of almond extract for a unique twist!

    • 1/4 teaspoon salt
      Just a pinch to brighten the flavors and balance the sweetness. Trust me, it lifts everything up!

    Step-by-Step Instructions

    Now that we’ve lined up our ingredients, it’s time for the fun part—the cooking! Follow these steps, and soon enough, you’ll find yourself indulging in these delightful cookies.

    1. Get Your Situation Ready:
      Grab a large mixing bowl and a medium saucepan. You’ll want to have some wax paper or parchment ready too because the assembly gets real here!

    2. Melt the Good Stuff:
      In the saucepan, combine the sugar, milk, and unsweetened cocoa powder. Put it over medium heat and bring this glorious mixture to a gentle boil. Remember to stir occasionally! It should boil for about 2 minutes until it’s all glossy and bubbling. This step is crucial as it helps the sugar dissolve fully into the mixture, making the cookies fudgy and divine.

    3. Add the Peanut Butter:
      Once it’s boiling up nicely, pull the saucepan off the heat. Stir in the creamy peanut butter and vanilla extract. This is where the magic happens—mix it until it’s all smooth and melted together. Ah, that rich aroma; it’s heavenly!

    4. Toss in the Oats and Salt:
      Now, throw in the old-fashioned oats and the salt. Stir, stir, stir! Get everything coated so that each oat is a little chocolatey parcel of delight. Yes, it will look a little wild and chaotic, but that’s part of the charm!

    5. Scoop and Chill:
      Using a spoon or a cookie scoop (for neatness), drop spoonfuls of the cookie mixture onto the wax paper or parchment. You can shape them a bit if you’d like, but they don’t need to be perfect. Just get them onto the sheet so they can chill! The cookies will need about 30–60 minutes in the fridge to set, just enough time to sip on some post-cookie-baking coffee!

    6. Taste Test Time!
      After they have set, it’s time to dive in! They’ll be chewy, chocolaty, and just sweet enough—truly a treat worth indulging in! You’ll find that no-bake cookies have a unique texture that’s different but delightful.

    Serving Suggestions

    When it comes to serving these cookies, simplicity is key. Arrange them on a colorful platter or in a fun decorative jar for a rustic touch. Sweeten the experience by pairing them with a glass of cold milk or a warm mug of hot cocoa. For the extra fancy touch, you can even sprinkle a pinch of sea salt on top of the cookies right before serving. It elevates the taste and adds a visual flair!

    Feeling extra indulgent? Try them in a cookie sandwich by placing a scoop of ice cream between two cookies for a delectable dessert that truly impresses!

    Recipe Variations

    If you’re feeling adventurous, here are some fun twists and variations you can explore with these cookies:

    • Nutty Additions: Fold in some chopped nuts like walnuts or pecans for a crunchy texture. Or, if you want to keep it nut-free, try some sunflower seeds or sesame seeds!

    • Scoop of Fun: Add mini chocolate chips or butterscotch chips to the mixture for extra sweetness, or even drizzle some melted chocolate on top for a more decadent version.

    • ** Oat Substitution:** If you’re craving a gluten-free option, simply use certified gluten-free oats, or mix in some rice puffs for a unique twist!

    • Flavor Infusion: Switch up the peanut butter with almond butter or cashew butter for a different flavor profile. You can even try adding a dash of cinnamon or espresso powder for a little kick!

    • Dark Chocolate Delight: For all the dark chocolate lovers, replace half the normal cocoa with dark cocoa powder for an ultra-rich taste!

    Chef’s Notes

    Ah, the nostalgia as I whip up this recipe! Over the years, I’ve experimented with different add-ins and substitutions, which has made these cookies even more versatile. Sometimes, I even add a splash of cold brew coffee, and trust me, it takes them to a whole new level!

    Another fun memory comes to mind; I once had an impromptu cookie party with friends, and we decided to top them with sprinkles, shredded coconut, and even crushed pretzels. The creativity that came from those kitchen experiments was simply magical. It’s a reminder that cooking is not just about following a recipe; it’s about enjoying the process and letting our imaginations roam free.

    FAQs and Troubleshooting

    Q: My cookies didn’t set properly. What did I do wrong?
    A: If your cookies are too soft, you might have missed the boiling time. Make sure to let the mixture boil for at least 2 minutes before adding the oats. If they’re still too gooey, you can try refrigerating them a bit longer.

    Q: Can I use quick oats instead of old-fashioned oats?
    A: Yes, but keep in mind that quick oats will yield a slightly different texture! They may result in a softer cookie, but still delicious!

    Q: How do I store my no-bake cookies?
    A: Store them in an airtight container in the fridge for up to a week. You can also freeze them for up to two months if you want to save some for later!

    Q: Can I make them dairy-free?
    A: Absolutely! Use dairy-free milk and a vegan alternative for peanut butter or even tahini, and you’re good to go!

    Nutritional Info

    These No-Bake Chocolate Oatmeal Cookies pack a punch when it comes to flavor and nutrition. Each cookie contains:

    • Calories: Approximately 120-140 calories (based on size)
    • Protein: About 3g from peanut butter
    • Fiber: Around 1.5g from oats
    • Fat: Approximately 7g (mostly healthy fats from peanut butter)

    With oats providing complex carbohydrates and peanut butter adding a dose of protein, these cookies aren’t just desserts; they can be a quick post-workout snack for those needing a boost!

    Final Thoughts

    And there you have it, my fabulous friends—a delightful journey into the world of No-Bake Chocolate Oatmeal Cookies! I hope you’ll give these a try and bask in the joy they bring. Remember, it’s not just about making a delicious treat; it’s about creating moments and memories in the kitchen, sharing laughter, and enjoying every bite.

    So, the next time you need a quick sweet fix or want to elicit smiles from your loved ones, you know this recipe is a winner! Don’t forget to experiment, explore, and maybe even bring your own flair to this classic recipe! As always, let’s keep that kitchen cozy and full of flavor. Happy cooking, and I can’t wait to hear about your adventures with this no-bake cookie magic! 🍪❤️

    Print

    No-Bake Chocolate Oatmeal Cookies

    A chewy, chocolatey delight that comes together easily without an oven, perfect for satisfying sweet cravings.

    • Author: emmawhitaker
    • Prep Time: 15 minutes
    • Cook Time: 10 minutes
    • Total Time: 25 minutes
    • Yield: 24 cookies 1x
    • Category: Dessert
    • Method: No-Bake
    • Cuisine: American
    • Diet: Vegetarian

    Ingredients

    Scale
    • 2 cups old-fashioned oats
    • 1 cup creamy peanut butter
    • 1 cup granulated sugar
    • 1/2 cup unsweetened cocoa powder
    • 1/2 cup milk (or dairy-free milk)
    • 1 teaspoon vanilla extract
    • 1/4 teaspoon salt

    Instructions

    1. Get your situation ready: Grab a large mixing bowl and a medium saucepan, with wax paper or parchment ready.
    2. Melt the good stuff: In the saucepan, combine the sugar, milk, and cocoa powder. Bring to a gentle boil for about 2 minutes, stirring occasionally.
    3. Add the peanut butter: Remove from heat and stir in the peanut butter and vanilla extract until smooth.
    4. Toss in the oats and salt: Stir until all oats are coated in the chocolate mixture.
    5. Scoop and chill: Drop spoonfuls onto wax paper or parchment and chill for 30-60 minutes until set.
    6. Taste test time! Enjoy your chewy, chocolaty cookies after they have set.

    Notes

    For a healthier option, consider using coconut sugar or maple syrup. Substitute peanut butter with sunflower seed butter for a nut-free version.

    Nutrition

    • Serving Size: 1 cookie
    • Calories: 130
    • Sugar: 10g
    • Sodium: 75mg
    • Fat: 7g
    • Saturated Fat: 1.5g
    • Unsaturated Fat: 5g
    • Trans Fat: 0g
    • Carbohydrates: 15g
    • Fiber: 2g
    • Protein: 3g
    • Cholesterol: 0mg

    Keywords: no-bake cookies, chocolate cookies, oatmeal cookies

    Did you make this recipe?

    Share a photo and tag us — we can’t wait to see what you’ve made!