emmawhitaker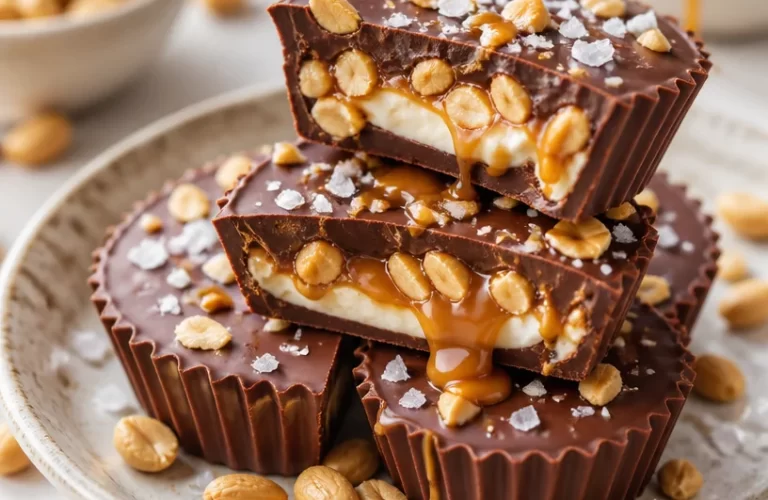
Indulge in Deliciousness with Protein Salted Peanut Caramel Cups
Hey there, fellow food lovers! Today we’re diving into a sweet little treat that combines nutty, creamy, and salty goodness. If you’re ready for a flavor adventure, let’s whip up some scrumptious Protein Salted Peanut Caramel Cups! Who says indulgence can’t be guilt-free? These delightful little cups are packed with protein, making them perfect for an after-workout snack or a sweet treat any time of the day.
When it comes to cooking, I always remind my readers: it doesn’t have to be complicated to be incredible. You’ll see this mantra come alive in this recipe, where we take simple ingredients and transform them into something remarkable. So grab your apron, and let’s get started!
A Little Bit of Nostalgia
In my childhood home, weekends were a time for family gatherings, laughter, and, of course, sweets! My grandma had this incredible knack for whipping up delightful desserts that seemed like they were straight out of a fairy tale. One of my favorite memories was when she’d surprise us with her version of peanut butter cups, only she used caramel instead of chocolate, making them even more irresistible. I can still picture my younger self sneaking a bite when no one was looking, the melty caramel oozing out with a hint of salt—joyful bliss!
Fast forward to today, and I’ve brought that same joy into these Protein Salted Peanut Caramel Cups. They’re not just a ode to my grandma’s sweet magic but also a testament to making treats that fit into our modern routines. They’re creative, delicious, and oh-so-simple to make!
Ingredients You’ll Need
Here’s what you’ll need to gather for this delightful treat. Each ingredient has its little story (or tip) that I’m excited to share with you:
-
Greek Yogurt: This is our secret weapon for adding creaminess without the extra calories. It’s high in protein and gives the filling a smooth texture. You can swap it for any non-dairy yogurt if you prefer a plant-based option.
-
Peanuts: Roasted and unsalted peanuts are the hero of this recipe. They bring that classic peanut flavor! If you have a nut allergy or want something different, try sunflower seeds for a similar crunch.
-
Caramel Sauce: Store-bought caramel works like a charm, but if you’re feeling adventurous, homemade caramel is always an option. It can also be replaced with date caramel for a healthier twist.
-
Sea Salt: This is what takes the flavor profile of these cups to the next level. It amplifies the sweetness and gives that irresistible salty-sweet contrast! If you don’t have sea salt, kosher salt works fine too.
-
Dark Chocolate: Look for a quality chocolate (70% cacao or higher) for that rich flavor. If you’re allergic to chocolate or prefer a sweeter taste, white chocolate can be used instead.
Let’s Get Cooking!
Now that we’ve got our ingredients lined up, it’s time to bring these Peanut Caramel Cups to life! Here’s how to do it step by step:
-
Prep Your Workspace: Grab a muffin tin and line it with cupcake liners for easy removal. Trust me; you’ll thank me later when it’s time to devour them!
-
Melt the Chocolate: In a microwave-safe bowl, melt about half of your dark chocolate. Heat in 30-second bursts, stirring in between until smooth. This is one of my favorite chef hacks—microwaving chocolate is quick and prevents burning.
-
Coat the Liners: Using a spoon or a small pastry brush, carefully coat the inside of each liner with melted chocolate. about 1/3 of the way up the sides should do it. Make sure to save some chocolate for the top! Pop the muffin tray into the fridge for about 10 minutes to set.
-
Prepare the Filling: While the chocolate hardens, let’s get to mixing! In a bowl, stir together Greek yogurt, chopped peanuts, and a pinch of sea salt. This creamy mix is where the magic happens!
-
Fill the Cups: Take your muffin tray out of the fridge. Carefully spoon the peanut-yogurt mixture into the chocolate-coated liners, filling each about halfway. Take a moment to admire your handiwork—it’s looking good!
-
Add the Caramel: Drizzle a generous amount of caramel sauce over that filling. The more caramel, the merrier (that’s my motto)! Use a toothpick to swirl it in gently, creating a fun pattern.
-
Top it Off: Next, melt the remaining dark chocolate and drizzle it over the caramel layer, sealing everything in. If you’re feeling extra fancy, you can sprinkle a bit more sea salt on top for that finishing touch.
-
Set Again: Pop the tray back into the fridge for at least 30 minutes until the chocolate is set completely. This is the hard part—waiting!
Plating and Serving Suggestions
Once your cups are fully set and you’ve managed to contain your excitement (no judgment!), it’s time to serve them up! They can be presented right in the cupcake liners, or you can gently remove them for a more elegant presentation on a sweet platter. Consider drizzling a little extra caramel on top before serving, along with some additional chopped peanuts for that extra crunch and style. These treats are indulgent yet feel like a fun, cheeky dessert to sparkle up your table!
Recipe Variations
I love how versatile this recipe can be! Here are a few fun twists you can try:
- Nut-Free Version: Replace the peanuts with pumpkin or sunflower seeds to make it nut-free and just as delightful!
- Flavor Boost: Add a splash of vanilla extract to the yogurt mixture for an aromatic lift.
- Crunchy Texture: Blend in some puffed quinoa or brown rice crisps for added crunch.
- Spicy Kick: For a tangy twist, mix a bit of cayenne pepper into the caramel for a salted caramel with a spicy finish.
- Vegan Delight: Swap Greek yogurt for a plant-based yogurt and ensure your chocolate is dairy-free!
Chef’s Notes
Cooking is all about experimentation! Over the years, I’ve played around with variations of these cups, adjusting the sweetness and adding different spices to find that magic blend. There was even a time I added a hint of espresso powder in the chocolate—dreamy! Each time I make these, it brings me back to my grandma’s kitchen, filled with laughter and the sweet aroma of melting chocolate. I always encourage aspiring cooks to embrace their own stories in the kitchen; food is an extension of love and care!
FAQs and Troubleshooting
1. My chocolate isn’t melting properly; what do I do?
If the chocolate seizes, try adding a small splash of coconut oil to help it smooth out. Remember to heat in short bursts!
2. Why did my caramel turn out too hard?
If you’re making caramel from scratch, be cautious with the cooking time. It’s better to undercook slightly than overcook. You want a pourable consistency!
3. Can I leave these out at room temperature?
While they can sit out for a brief period, I recommend keeping them refrigerated until serving to prevent melting.
4. What if I don’t have muffin liners?
No worries! You can lightly grease a muffin tin directly or use silicone molds for easy release.
Nutritional Info
(If you’re curious about the health aspect, here’s a quick outline—feel free to substitute with your preferred brands or ingredients!)
- Calories per cup: approximately 150
- Protein: 5g
- Carbs: 15g
- Fat: 8g
- Fiber: 2g
As a food lover and home cook, I’m always excited to share recipes that inspire confidence in the kitchen. So there you have it—Protein Salted Peanut Caramel Cups that will tickle your taste buds and warm your spirit! Whether you’re treating yourself after a long day or sharing with loved ones, I hope this dish brings you as much joy as it brings me. Happy cooking and even happier indulging!
PrintProtein Salted Peanut Caramel Cups
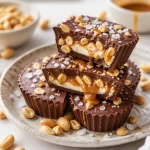
Guilt-free indulgence with protein-packed salted peanut caramel cups, perfect for a sweet treat or post-workout snack.
- Prep Time: 15 minutes
- Cook Time: 10 minutes
- Total Time: 55 minutes
- Yield: 12 servings 1x
- Category: Dessert
- Method: Chilling and Melting
- Cuisine: American
- Diet: Vegetarian
Ingredients
- 1 cup Greek Yogurt
- 1 cup Roasted Unsalted Peanuts
- 1/2 cup Caramel Sauce
- 1/4 teaspoon Sea Salt
- 1 cup Dark Chocolate (70% cacao or higher)
Instructions
- Prep your workspace by lining a muffin tin with cupcake liners.
- Melt the dark chocolate in a microwave-safe bowl using 30-second bursts until smooth.
- Coat the liners with melted chocolate about 1/3 of the way up the sides and refrigerate for 10 minutes to set.
- Prepare the filling by mixing Greek yogurt, chopped peanuts, and sea salt in a bowl.
- Fill the cups halfway with the peanut-yogurt mixture.
- Add a generous drizzle of caramel sauce over the filling and swirl it in gently with a toothpick.
- Top off with melted dark chocolate and a sprinkle of sea salt if desired.
- Set the tray in the fridge for at least 30 minutes until chocolate is completely set.
Notes
For a nut-free version, replace peanuts with pumpkin or sunflower seeds. You can also try adding vanilla extract or crusted puffed quinoa for texture.
Nutrition
- Serving Size: 1 cup
- Calories: 150
- Sugar: 10g
- Sodium: 100mg
- Fat: 8g
- Saturated Fat: 4g
- Unsaturated Fat: 3g
- Trans Fat: 0g
- Carbohydrates: 15g
- Fiber: 2g
- Protein: 5g
- Cholesterol: 5mg
Keywords: peanut, caramel, dessert, protein snack, guilt-free treat