emmawhitaker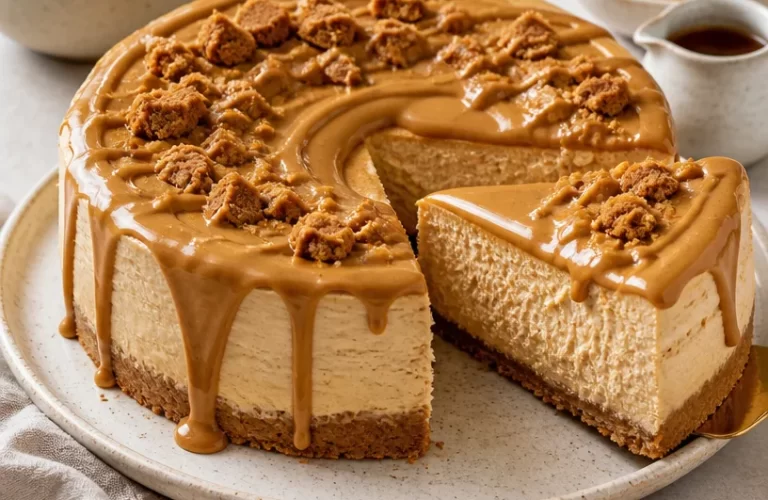
The Delight of Protein Maple Cookie Butter Cheesecake
Hello, fellow food lovers! Today, I’m thrilled to share with you an indulgent yet surprisingly wholesome treat that’s bound to become a favorite in your kitchen. Say hello to my Protein Maple Cookie Butter Cheesecake! Yes, you read that right! Cheesecake that not only satisfies your sweet tooth but also packs a protein punch!
Now, I know what you might be thinking: "Cheesecake? Healthy? Tell me more!" But don’t worry, this recipe is designed with you in mind—bringing all the delightful flavors of your favorite dessert while keeping it simple and nutritious. It’s perfect for a cozy night in or as a delightful addition to any gathering with friends and family. So, grab your apron and let’s create some kitchen magic together!
Picture this: it’s a chilly Sunday afternoon, and I’m in my cozy kitchen, equipped with the scent of maple wafting through the air. It’s that time of year where everything feels a little sweeter, and I can’t help but be nostalgic about the many Sundays spent baking with my grandmother. She had a special knack for transforming simple ingredients into delightful desserts that we would eagerly await after our Sunday family dinners. One of her favorites was a creamy, dreamy cheesecake topped with various fruits, but I wanted to elevate that quintessential treat with a modern twist.
Fast-forward to today, and here we are—I’ve merged that comforting family memory with my ever-growing love for protein-packed ingredients. With Greek yogurt, cookie butter, and maple protein, we’ll create a cheesecake that not only whisks you back to those Sunday sessions of laughter and togetherness but also nourishes your body. Let’s jump right in!
Ingredients
Here’s what you’ll need for this luscious Protein Maple Cookie Butter Cheesecake:
-
2 cups Greek yogurt
A stellar source of protein and a fantastic base for creamy desserts! If you’re looking for a dairy-free option, you can try coconut yogurt or cashew yogurt as a substitute. -
1 cup cookie butter
This magical spread brings a warm, spiced flavor to the cheesecake. If you can’t find cookie butter, feel free to use almond butter or nut butter of your choice for a different, nutty flavor profile. -
½ cup maple protein powder
Packed with protein and a hint of sweetness, this ingredient is what makes our cheesecake both delicious and nutritious. If you don’t have maple protein powder, vanilla protein powder would work too—just add a touch more maple syrup for flavor. -
1/3 cup sweetener
Depending on your preference, you can use honey, agave syrup, or a low-calorie sweetener. Adjust the amount to suit your sweetness cravings! -
1 teaspoon vanilla extract
The magic ingredient that enhances all flavors, making your cheesecake ever so aromatic! -
1 tablespoon cornstarch
This acts as a thickener to give our cheesecake that perfect texture. You can substitute it with arrowroot powder if you’re looking for a more natural alternative. -
Pinch of salt
Salt lifts flavors, trust me! It balances the sweetness and makes every bite pop.
Tips and Insights
When it comes to baking, keep your ingredients at room temperature when possible, especially the Greek yogurt and cookie butter. This helps them blend more seamlessly, ensuring a smooth, creamy cheesecake. Also, feel free to adjust the amount of sweetener depending on your taste buds. Some like it sweeter, while others like a touch less!
Step-by-Step Instructions
Now, let’s get down to the fun part—making our cheesecake!
-
Gather Your Tools
First things first, preheat your oven to 350°F (175°C). Also, line the bottom of an 8-inch springform pan with parchment paper and lightly grease the sides. This ensures a flawless release when we’re ready to enjoy our cheesecake. -
In a Large Bowl
Combine the Greek yogurt, cookie butter, maple protein powder, sweetener, vanilla extract, cornstarch, and a pinch of salt. Using a hand mixer or a whisk, blend the mixture until it’s smooth and creamy. Ensure that all lumps are gone—nobody wants a chunky cheesecake! -
Pour into the Pan
Once your batter is beautifully melded, pour it into the prepared springform pan. Use a spatula to smooth the top. It doesn’t have to be perfect; we’re aiming for rustic charm here, remember? -
Bake to Perfection
Place your cheesecake in the preheated oven and bake for about 25-30 minutes. You’ll see the edges set while the center could still be a tad jiggly—that’s absolutely ideal! It will continue to firm up as it cools. -
Cool Down
After baking, turn off the oven and crack the oven door open. Let the cheesecake cool in the oven for another 30 minutes. This gentle cooling will help prevent cracks. After that, transfer it to the refrigerator and chill for at least 2-3 hours (or ideally overnight) to let all those flavors meld beautifully! -
Unmold and Serve
When you’re ready to serve, gently run a knife around the edges before releasing the springform pan. Voilà! You’ve got a stunning cheesecake just waiting to be enjoyed.
Chef’s Tip:
For added flair, garnish with a drizzle of maple syrup and a sprinkle of crushed cookies or nuts. It’s all about giving it that little extra love!
Serving Suggestions
When it comes to plating, simplicity is key! A slice of our Protein Maple Cookie Butter Cheesecake served on a clean white plate allows the vibrant colors to shine through. Drizzle with a touch of maple syrup and a scatter of cookie crumbles or fresh berries for a delightful contrast!
You could also serve it alongside a dollop of whipped cream or a scoop of your favorite ice cream for a decedent treat. Trust me; it’ll elevate your cheesecake experience!
Recipe Variations
Here are a few fun variations to consider that can help mix things up:
-
Chocolate Swirl: Add 1/3 cup melted chocolate into the batter before pouring it into the pan for a rich chocolate flavor.
-
Fruit Fusion: Top your cheesecake with fresh berries or a compote for a burst of freshness. Strawberries and blueberries pair beautifully!
-
Nutty Delight: Stir in 1/4 cup chopped nuts into the batter for an added crunch, or serve with some candied pecans on top.
-
Pumpkin Spice: Replace some of the cookie butter with pumpkin puree and add pumpkin spice for a seasonal twist.
Chef’s Notes
This recipe has come a long way since my baking adventures with my grandmother. Initially, my cheesecakes were made with cream cheese and heavy cream—delicious, of course, but definitely not what I’m aiming for now. After experimenting with Greek yogurt, I fell in love with how creamy it turned out while still being lighter and healthier.
Each bite of this Protein Maple Cookie Butter Cheesecake takes me back to those cherished memories in the kitchen, and I hope it brings you some of that joy, too. Remember, cooking is all about exploration and having fun!
FAQs and Troubleshooting
Q: My cheesecake cracked while baking. What did I do wrong?
This can happen if the oven temperature is too high or if it wasn’t cooled gradually. To prevent cracking, bake at a lower temperature and let it cool slowly in the oven with the door ajar.
Q: Can I make this cheesecake ahead of time?
Absolutely! It stores beautifully in the fridge for up to five days. Just wait to add any toppings until you’re ready to serve.
Q: How do I know when my cheesecake is done?
The edges should be set while the center remains slightly jiggly. Remember, it will firm up as it cools.
Q: Can I freeze this cheesecake?
Yes! Wrap it tightly in plastic wrap and store it in an airtight container. When ready to eat, let it thaw in the fridge overnight.
Nutritional Info
(For reference, based on a slice of cheesecake made from this recipe)
- Calories: 218
- Protein: 12g
- Fat: 8g
- Carbohydrates: 25g
So there you have it, friends! A delicious and nourishing Protein Maple Cookie Butter Cheesecake that’s sure to impress. I hope you feel inspired to whip this up in your own kitchen and create your own sweet memories. Happy cooking, and see you next time!
PrintProtein Maple Cookie Butter Cheesecake
Indulge in a wholesome dessert that combines the delightful flavors of cheesecake with a protein-packed twist, featuring Greek yogurt and cookie butter.
- Prep Time: 15 minutes
- Cook Time: 30 minutes
- Total Time: 45 minutes
- Yield: 8 servings 1x
- Category: Dessert
- Method: Baking
- Cuisine: American
- Diet: Healthy
Ingredients
- 2 cups Greek yogurt
- 1 cup cookie butter
- ½ cup maple protein powder
- 1/3 cup sweetener
- 1 teaspoon vanilla extract
- 1 tablespoon cornstarch
- Pinch of salt
Instructions
- Preheat your oven to 350°F (175°C) and prepare an 8-inch springform pan.
- Combine Greek yogurt, cookie butter, maple protein powder, sweetener, vanilla extract, cornstarch, and salt in a large bowl.
- Blend the mixture until smooth and creamy with a hand mixer or whisk.
- Pour the batter into the prepared springform pan and smooth the top with a spatula.
- Bake in the preheated oven for about 25-30 minutes, until the edges are set and the center is slightly jiggly.
- Cool the cheesecake in the oven with the door cracked for another 30 minutes, then refrigerate for at least 2-3 hours.
- Gently run a knife around the edges, release the springform pan, and serve.
Notes
For added flair, garnish with a drizzle of maple syrup and a sprinkle of crushed cookies or nuts. This cheesecake can be made ahead of time and stored in the fridge for up to five days.
Nutrition
- Serving Size: 1 slice
- Calories: 218
- Sugar: 10g
- Sodium: 150mg
- Fat: 8g
- Saturated Fat: 2g
- Unsaturated Fat: 4g
- Trans Fat: 0g
- Carbohydrates: 25g
- Fiber: 2g
- Protein: 12g
- Cholesterol: 5mg
Keywords: cheesecake, protein dessert, healthy dessert, cookie butter, Greek yogurt