 emmawhitaker
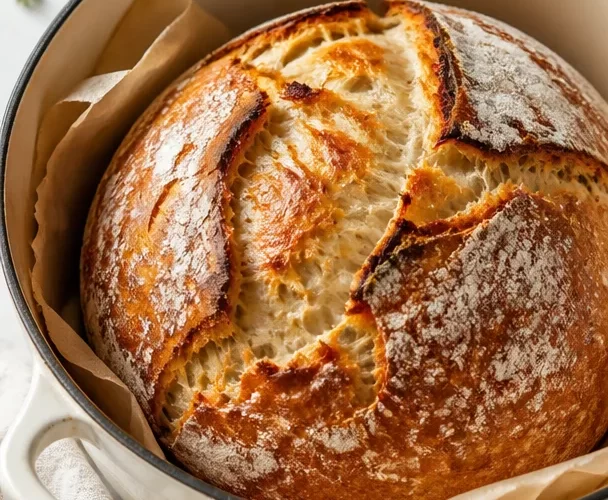
The Art of Dutch Oven Bread: A Cozy Kitchen Adventure
Hey there, fellow bread enthusiast! 🍞✨ Welcome to Tasty Chow, where we’re diving into the warm, crusty world of Dutch oven bread. If you’ve ever wanted to smell the enticing aroma of freshly baked bread wafting through your kitchen, you’re in for a treat! Making bread may sound daunting, but I promise—it’s easier than you think, and rewarding in more ways than one.
Bread has a way of connecting us. I’ve always believed there’s something magical about the process of transforming simple ingredients into a crusty loaf. Picture this: a golden crust, soft pillowy interior, and that incredible crackle when you pull it out of the oven. It’s the kind of moment that makes your heart skip a beat and your belly rumble in anticipation.
Whether you’re a seasoned baker or a newbie, this Dutch oven bread recipe is perfect for anyone looking to make something special. Get ready to impress your family (or yourself!) with minimal fuss and maximum flavor. And trust me, you’ll want to text your best friend to share the good news once that bread comes out of the oven. Let’s roll up our sleeves and start baking!
My Bread Journey
Growing up, bread wasn’t just food—it was an experience filled with love and laughter in my grandmother’s kitchen. I can still recall those Sunday afternoons when the scent of freshly baked bread filled the air, mingling with hints of cinnamon and butter. I remember standing on a stool to get a glimpse of the mixer as she kneaded dough with all the care in the world. Each loaf was a labor of love, crafted with patience and sprinkled with joy.
One of my fondest memories was the time my grandma decided to teach me how to bake her famous rustic bread. Flour flew everywhere as we giggled, struggling to get it all mixed together. When we finally placed the dough into the oven, we anxiously paced back and forth, peeking through the oven window like excited kids on Christmas morning. That first bite—golden crust, soft inside, and slathered with butter—had me hooked.
That experience ignited my passion for bread-making, and it laid the foundation for Tasty Chow. Today, I’m excited to share this Dutch oven bread recipe with you, so you can create your cherished moments in the kitchen just like I did.
Ingredients
Here’s what you’ll need for this simple Dutch oven bread. Each ingredient brings something unique to the mix:
-
All-Purpose Flour (3 cups): The backbone of our bread! It provides the structure. Feel free to swap half with whole wheat for a nutty flavor.
-
Instant Yeast (1 teaspoon): This is what gives our bread that lovely rise. If you only have active dry yeast, use the same amount; just bloom it in warm water first.
-
Salt (1 teaspoon): Essential for flavor, plus it strengthens the dough. Sea salt or kosher salt work well here.
-
Warm Water (1 ½ cups): It activates the yeast. Make sure it’s around 110°F (about 43°C); too hot will kill the yeast, and too cool will slow it down.
-
Olive Oil (2 tablespoons): Adds flavor and moisture. You can substitute with melted butter or vegetable oil if you prefer.
-
Optional Add-ins: Cheese, herbs, or garlic for an extra kick! A handful of shredded cheese or chopped rosemary can be mixed into the dough before baking for an exciting twist.
Step-by-Step Instructions
Alright, let’s get our hands doughy! 👐 Here are your steps to homemade Dutch oven bread perfection:
-
Mixing the Dry Ingredients: In a large mixing bowl, combine the flour, salt, and instant yeast. Give it a good whisk to ensure they’re evenly distributed. Chef tip: Make sure to add the salt and yeast on opposite sides of the bowl. Salt can inhibit yeast growth if it comes in direct contact.
-
Add Warm Water: Slowly pour in the warm water and olive oil. Using a wooden spoon or your hands, mix until a shaggy dough forms. It should feel sticky but not completely unmanageable. Pro tip: If it feels too dry, add a touch more water—every flour absorbs differently.
-
Kneading: Transfer the dough onto a floured surface and knead for about 5-7 minutes until the dough becomes smooth and elastic. Form it into a ball. This builds strength in the gluten network for that perfect chew. If you’re short on time, don’t worry; you can skip the kneading and let it rest longer.
-
First Rise: Place the dough back in the bowl, cover it with a damp kitchen towel, and let it rise in a warm spot for about 1 to 2 hours, or until it has doubled in size. Chef hack: If you’re short on time, a quick warm oven (turned off) or a sunny spot on the countertop works wonders for rising.
-
Shape the Dough: Once the dough has risen, flour your counter and gently deflate it. Shape it into a round loaf, then cover it with the towel again and let it rest for another 30 minutes.
-
Preheating the Oven and Introducing the Dutch Oven: While waiting, preheat your oven to 450°F (232°C). Place your Dutch oven (with its lid) inside to heat up—this magic step creates the perfectly crusty exterior.
-
Final Touches: Carefully take the hot Dutch oven out (remember that it’s HOT!). Using a parchment paper sling or generously floured hands, transfer your dough into the pot. You can score the top with a sharp knife for a rustic look and to help control how the loaf expands while baking.
-
Baking: Cover it with the lid and bake for 30 minutes. It will steam inside, creating that signature crust. After 30 minutes, remove the lid and bake for an additional 15-20 minutes until golden brown. Keep an eye on it—it can go from tan to too crispy quickly!
-
Cooling: Once baked, carefully transfer your beautiful bread to a wire rack to cool for at least 30 minutes before slicing. This step is tough, but it makes a huge difference in texture!
Serving Suggestions
The moment you slice into that crusty masterpiece, the smell of your Dutch oven bread will fill the room. It’s time to showcase your creation! Serve warm with a pat of butter, a drizzle of olive oil, or alongside a hearty soup or salad. You might even want to toast slices for a breakfast treat topped with avocado and a sprinkle of sea salt or enjoy alongside your favorite cheese for a delightful charcuterie board.
Feeling adventurous? Use this bread as the base for sliders or bruschetta. The options are endless!
Recipe Variations
Here are a few ways to get creative with your Dutch oven bread:
-
Herb and Garlic Bread: Mix in minced garlic and fresh herbs like rosemary or thyme for a fragrant twist.
-
Cheesy Delight: Fold in shredded cheese like cheddar or mozzarella before the first rise for a cheesy surprise with every bite.
-
Whole Wheat Option: Substitute half of the all-purpose flour with whole wheat flour for a heartier loaf.
-
Seed Topping: Before baking, sprinkle sesame or poppy seeds on top for texture and flavor.
-
Sweet Cinnamon Bread: Add a sprinkle of cinnamon and sugar into the dough for a sweet treat—perfect for breakfast!
Chef’s Notes
Making Dutch oven bread has become one of my favorite go-to recipes. It’s hard to believe that I once felt intimidated by bread-making! Over the years, I’ve learned that practice makes perfect—don’t be afraid to experiment with flavors. And sometimes, the bread doesn’t come out picture-perfect, but guess what? There’s no such thing as a bad loaf. Every bake is a new adventure, and each crumb is a delicious testament to your efforts!
FAQs and Troubleshooting
-
Why didn’t my bread rise? Check your yeast! Make sure it’s fresh and activated properly. You can test it by adding a teaspoon to warm water with a pinch of sugar and waiting about 5 minutes.
-
My crust is too hard. If your crust turns out overly tough, don’t be afraid to lower the temperature slightly and cover it with foil for the last few minutes of baking.
-
Why is my bread dense? You might not be kneading the dough enough or could have added too much flour. It should be a bit sticky but manageable.
-
How do I store this bread? Keep the bread wrapped in a kitchen towel at room temperature, or slice and freeze pieces to enjoy later.
Nutritional Info
This recipe makes about 12 servings. Here’s a brief rundown of the nutritional value per serving:
- Calories: Approximately 150
- Protein: 4g
- Carbohydrates: 30g
- Fat: 3g
- Fiber: 1g
Keep in mind that nutritional values can vary based on added ingredients and specific brands!
Final Thoughts
There you have it, my lovely friends—a beautiful Dutch oven bread that’s simple, satisfying, and oh-so-delicious. From kneading to rising to baking, the journey of making bread is filled with joy, patience, and anticipation. I hope you discover the same magic in your kitchen as I have over the years.
So get ready to warm your home with the enticing smell of baking bread, create new memories, and share delicious slices of life with your loved ones. Don’t forget to reach out and let me know how your bread turns out. Happy baking, and let’s keep that Tasty Chow spirit alive!
Until next time,
— Emily 🍞❤️
Dutch Oven Bread
A warm and crusty Dutch oven bread that’s simple to make and incredibly rewarding.
- Prep Time: 15 minutes
- Cook Time: 45 minutes
- Total Time: 60 minutes
- Yield: 12 servings 1x
- Category: Bread
- Method: Baking
- Cuisine: American
- Diet: Vegetarian
Ingredients
- 3 cups All-Purpose Flour
- 1 teaspoon Instant Yeast
- 1 teaspoon Salt
- 1 ½ cups Warm Water
- 2 tablespoons Olive Oil
- Optional Add-ins: Cheese, herbs, or garlic
Instructions
- Mix the dry ingredients: In a large mixing bowl, combine the flour, salt, and instant yeast. Give it a good whisk to ensure they’re evenly distributed.
- Add warm water and olive oil. Using a wooden spoon or your hands, mix until a shaggy dough forms.
- Knead the dough on a floured surface for about 5-7 minutes until smooth and elastic.
- Place the dough back in the bowl, cover it with a damp kitchen towel, and let it rise for about 1 to 2 hours, or until doubled in size.
- Flour your counter, gently deflate the dough, and shape it into a round loaf. Rest for another 30 minutes.
- Preheat your oven to 450°F (232°C) with the Dutch oven inside.
- Carefully transfer your dough into the hot Dutch oven, cover it, and bake for 30 minutes.
- Remove the lid and bake for an additional 15-20 minutes until golden brown.
- Transfer the bread to a wire rack to cool for at least 30 minutes before slicing.
Notes
Feel free to experiment with flavors and add herbs, cheese, or spices to customize your bread.
Nutrition
- Serving Size: 1 slice
- Calories: 150
- Sugar: 0g
- Sodium: 400mg
- Fat: 3g
- Saturated Fat: 0.5g
- Unsaturated Fat: 1.5g
- Trans Fat: 0g
- Carbohydrates: 30g
- Fiber: 1g
- Protein: 4g
- Cholesterol: 0mg
Keywords: bread, baking, Dutch oven bread, homemade bread, artisan bread


