emmawhitaker
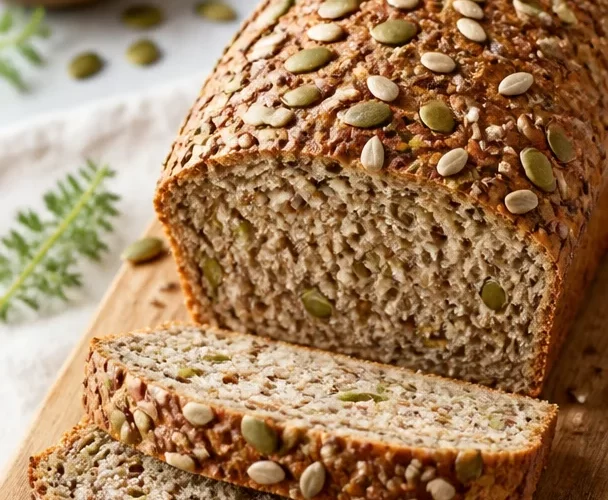
Harvest Seed Bread: A Nourishing Delight for Every Table
Hey there, fellow food enthusiast! Today, I want to share something that’s close to my heart and pantry—Harvest Seed Bread. This warm, hearty loaf is packed with wholesome grains and seeds, making it the perfect companion for any meal, from a cozy breakfast to a gourmet dinner. Not only does it fill your kitchen with the aroma of freshly baked goodness, but it also nourishes the soul. So, grab your apron and let’s dive into making this delightful bread together!
A Slice of Nostalgia
As a child, weekends at my grandmother’s house were a ritual. I remember waking up to the sound of the kettle boiling, and the smell of something wonderful wafting through the air. One particular Saturday, my grandma decided to bake her famous bread, an enticing mix of seeds and grains passed down through generations. Watching her mix and knead the dough, I felt a magic in the air—like we were creating something special together. She always said bread had a way of bringing people together, and I couldn’t agree more.
That afternoon, after hours of anticipation, we finally sliced into the warm loaf, slathered with homemade jam from her garden’s strawberries. The crust was perfectly crisp, while the inside was soft and pillowy. Each bite was filled with the nutrition of the seeds, and I felt a sense of connection, both to my grandma and to the simple, yet profound act of cooking. Fast forward to today, and that memory inspires me to share my own version of Harvest Seed Bread with you. Let’s create some new lovely memories around our dining tables!
Ingredients
Here’s what you’ll need to make your own Harvest Seed Bread:
-
Whole Wheat Flour (3 cups)
- A nutritious base for your bread, packed with fiber and essential nutrients. You can substitute with all-purpose flour, but the flavor and health benefits won’t be quite the same.
-
Active Dry Yeast (2 ¼ tsp)
- This helps the bread rise! If you have instant yeast, you can use the same amount, and there’s no need to activate it beforehand.
-
Warm Water (1 ¼ cups)
- This activates the yeast. Make sure it’s not too hot—think comfortable bath temperature! Too hot can kill the yeast, while too cold will leave it sluggish.
-
Honey (2 tbsp)
- A natural sweetener that also feeds the yeast. If you prefer, maple syrup or agave nectar can work as substitutes for a vegan option.
-
Olive Oil (2 tbsp)
- Adds richness and moisture to the bread. Avocado oil or melted coconut oil are great alternatives.
-
Mixed Seeds (¾ cup total)
- A blend is ideal—think sunflower, pumpkin, chia, and flaxseeds for texture and nutrition. Feel free to customize based on your tastes or what you have on hand!
-
Salt (1 tsp)
- Essential for flavor, but don’t overdo it! Kosher salt is recommended; table salt works too, but cut back slightly as it’s more potent.
Step-by-Step Instructions
Step 1: Activate the Yeast
-
Combine Warm Water and Honey: In a small bowl, mix the warm water with honey and let it sit for about 5 minutes until bubbly and frothy. This shows your yeast is lively!
Chef Tip: If after 5 minutes there are no bubbles, it’s best to start over with fresh yeast—we don’t want flat bread!
Step 2: Mix the Dough
-
In a Large Bowl: Combine the whole wheat flour and salt. Make a well in the center and pour in the yeast mixture followed by olive oil.
Commentary: The well is crucial—think of it as the dough’s little home where all the magic happens!
-
Stir Until Just Combined: Use a wooden spoon or spatula to blend the ingredients until they form a shaggy dough. Don’t worry about it being perfect at this stage.
Step 3: Knead the Dough
-
Turn Out onto a Floured Surface: Flour your countertop and place the dough on it. Knead for about 8-10 minutes until smooth and elastic.
Chef Hack: If your dough is too sticky, sprinkle a little more flour as you knead. Just don’t overdo it—too much can lead to dense bread!
Step 4: First Rise
-
Transfer to an Oiled Bowl: Form the dough into a ball and place it in a greased bowl, turning it to coat. Cover with a damp cloth and let it rest in a warm, draft-free area for 1-2 hours or until doubled in size.
Tip: A cozy spot near the oven works great if you’re preheating for something else!
Step 5: Shape the Loaf
-
Punch Down Dough: Once risen, use your fist to gently punch down the dough. This releases air. Transfer it back to your floured surface.
-
Add the Mixed Seeds: Knead in the mixed seeds until evenly distributed.
-
Shape Your Loaf: Form it into a loaf, tucking the ends underneath for a nice surface, and place it in a greased loaf pan.
Step 6: Second Rise
-
Cover Again: Let it rise for another 30-45 minutes, until puffy and rising above the edges of the loaf pan.
Commentary: This step helps develop those lovely air pockets in your bread, making it light and fluffy!
Step 7: Bake
-
Preheat Oven: While the dough is rising, preheat your oven to 375°F (190°C).
-
Bake the Bread: Bake for 30-35 minutes or until golden brown and the bread sounds hollow when tapped on the bottom.
Chef Note: If you have a thermometer, the internal temperature should be about 190°F. That’s the sweet spot for perfectly baked bread!
Serving Suggestions
Once your bread has cooled (if you can resist cutting into it right away), slice it thickly and serve with a pat of butter that melts beautifully on the warm loaf. Pair it with your favorite homemade jam, or enjoy it alongside a hearty soup or salad. It can also be transformed into melty toast topped with avocado, poached eggs, or even some nut butter for breakfast!
Recipe Variations
-
Herbed Harvest Bread: Add dried herbs like rosemary or thyme to the dough for an aromatic twist.
-
Cheesy Seed Bread: Incorporate shredded cheese, like cheddar or feta, into the mix for a rich flavor profile.
-
Nutty Delight: Toss in some chopped walnuts or almonds for extra crunch and nutrition.
-
Dried Fruit: Mix in some dried cranberries or raisins for a touch of sweetness.
-
Gluten-Free Option: Substitute the whole wheat flour for a gluten-free flour blend along with a teaspoon of xanthan gum to help with binding.
Chef’s Notes
This recipe has been a labor of love, evolving through various trials as I played with different seed combinations and techniques. I remember one time I forgot to cover the loaf during its second rise, and while it wasn’t my best work, it reminded me to embrace imperfections in the kitchen! Each loaf tells a story of creativity, resilience, and maybe a little too much flour around the kitchen!
FAQs and Troubleshooting
-
My dough didn’t rise! What did I do wrong?
- Most likely, your yeast was old or the water was too hot or too cold. Always check the expiration date on your yeast!
-
Why is my bread too dense?
- This can happen from too much flour or not kneading long enough. Aim for a smooth, elastic dough and be careful with your flour measurements.
-
Can I freeze the bread?
- Absolutely! Once cooled, wrap it tightly in plastic wrap and then in foil. It can last up to 2-3 months. Thaw at room temperature or toast slices directly from the freezer!
-
What if I don’t like seeds?
- No problem! Feel free to leave them out entirely, or substitute with your favorite flavorings, like herbs or spices.
Nutritional Info
A slice of this Harvest Seed Bread is not just delicious; it’s also packed with nutrients! Each slice offers approximately:
- Calories: 120
- Protein: 6g
- Fat: 3g (mostly healthy fats from seeds and olive oil)
- Carbohydrates: 20g
- Fiber: 3g
These nutrients come mainly from the whole wheat flour and seeds, making this bread a wholesome addition to your meals, perfect for energy and fullness!
Final Thoughts
I hope you feel inspired to whip up this wonderful Harvest Seed Bread! Remember, baking bread is not just about the finished product; it’s about the journey, the stories shared, and the love that goes into each loaf. So, don’t stress about getting everything perfect—every loaf has its own character and charm. Share it with loved ones, or savor it solo; either way, it’s bound to warm your heart and fill your tummy. Happy baking, and let’s make something delicious together!
— Emily 🥖❤️
PrintHarvest Seed Bread
A warm, hearty loaf packed with wholesome grains and seeds, perfect for any meal.
- Prep Time: 15 minutes
- Cook Time: 35 minutes
- Total Time: 50 minutes
- Yield: 12 servings 1x
- Category: Bread
- Method: Baking
- Cuisine: American
- Diet: Vegetarian
Ingredients
- 3 cups Whole Wheat Flour
- 2 ¼ tsp Active Dry Yeast
- 1 ¼ cups Warm Water
- 2 tbsp Honey
- 2 tbsp Olive Oil
- ¾ cup Mixed Seeds (e.g., sunflower, pumpkin, chia, flaxseeds)
- 1 tsp Salt
Instructions
- Combine warm water and honey in a small bowl, and let sit for about 5 minutes until bubbly.
- Mix whole wheat flour and salt in a large bowl, make a well, and add yeast mixture and olive oil.
- Stir until just combined to form a shaggy dough.
- Turn out onto a floured surface and knead for 8-10 minutes until smooth.
- Transfer dough to an oiled bowl, cover, and let rise for 1-2 hours until doubled.
- Punch down the dough, knead in mixed seeds, and shape into a loaf.
- Cover and let rise for another 30-45 minutes until puffy.
- Preheat oven to 375°F (190°C) and bake the bread for 30-35 minutes until golden brown.
Notes
Serve warm with butter, homemade jam, or as a side to soups or salads.
Nutrition
- Serving Size: 1 slice
- Calories: 120
- Sugar: 6g
- Sodium: 200mg
- Fat: 3g
- Saturated Fat: 0.5g
- Unsaturated Fat: 2.5g
- Trans Fat: 0g
- Carbohydrates: 20g
- Fiber: 3g
- Protein: 6g
- Cholesterol: 0mg
Keywords: bread, homemade, wholesome, seeds, baking, vegetarian