emmawhitaker
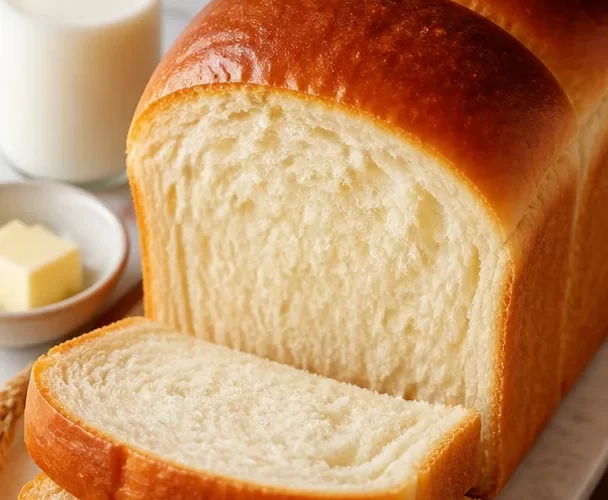
The Ultimate Guide to Making Soft and Fluffy Milk Bread
Hey there, fellow food lovers! Today, we are diving into the wonderful world of Milk Bread—a delightfully soft, tender loaf that has a subtle sweetness and a fluffy texture that will make any meal extraordinary. As you huddle in your kitchen, the aroma of freshly baked bread fills the air, evoking warm, comforting memories. Trust me, there’s nothing like the smell of bread baking to bring smiles all around!
I remember the first time I tasted Milk Bread; it was at a little café in my hometown. The moment I took a bite, I was whisked away to that cozy kitchen where my grandma used to bake. It was fluffy, slightly sweet, and perfect for slathering with butter or making decadent toast. I knew I had to recreate that magic, and the best part? It’s surprisingly easy to make!
In this post, I’ll not only guide you through my favorite Milk Bread recipe but also share personal stories, cooking hacks, and even some fun variations to keep your creativity flowing. Whether you’re a novice baker or a seasoned pro, this recipe is all about simplicity and joy. So, roll up your sleeves, dust off that apron, and let’s get ready to bake something incredible together!
Personal Story
I can still picture the scene so vividly: my grandma would whisk me away to the kitchen every Saturday morning, flour dusting the counter like a soft, white blanket. Armed with her well-worn, wooden spoon, she would show me how to knead dough, and together we would giggle as we accidentally flung flour in the air. It was our secret little world filled with the warm scent of cinnamon and freshly baked bread.
One Saturday, as we made a simple loaf of Milk Bread, I can still hear my grandma saying, “Just feel the dough, Emily. It should be soft, like a hug.” I remember that bread—not just because of its texture, but because it was part of a time when everything felt warm and carefree. That milk bread, especially toasted with a smear of butter, was a glow of happiness in those chilly mornings.
Fast forward to today, I’ve made it my mission to recreate that joy by sharing our family recipes. This Milk Bread has been a staple in my kitchen ever since, and I can’t wait for you to experience the same happiness in your own!
Ingredients
To make this pillowy Milk Bread, you’ll need the following ingredients:
-
All-Purpose Flour (4 cups): This forms the base of your bread, creating that oh-so-soft structure. If you’re looking for an alternative, try bread flour for a chewier texture, or even a mix of whole wheat to add some goodness!
-
Whole Milk (1 ½ cups, warmed): The secret ingredient! Whole milk adds moisture and a delightful richness to the bread. If you’re dairy-free, feel free to use almond or oat milk instead—just make sure to warm it!
-
Sugar (¼ cup): This provides a subtle sweetness to the dough. You can substitute with honey or maple syrup for a different flavor twist!
-
Active Dry Yeast (2 ¼ teaspoons): The magical ingredient that helps your bread rise! Always check the expiration date—active yeast is crucial for a nice fluffy loaf.
-
Salt (1 teaspoon): Essential for balancing flavors and enhancing the bread’s overall taste.
-
Butter (¼ cup, softened): This brings in richness and a touch of indulgence. You can swap it with coconut oil for a vegan-friendly option, or use a lighter margarine.
-
Egg (1, optional): Adding an egg creates a slightly richer dough, but you can omit it for a delightful vegan alternative.
Each ingredient works together to create that soft, light texture we all crave. Now, let’s get to the fun part—baking!
Step-by-Step Instructions
Step 1: Prepare the Yeast
Start by warming your milk in a saucepan until it’s warm but not too hot (think bath water, not boiling!). Remove it from the heat and sprinkle the yeast over the warm milk. Add a pinch of sugar and let it rest for about 5-10 minutes until it becomes frothy. This means your yeast is alive and ready to work its magic!
Step 2: Mix Dry Ingredients
In a large mixing bowl, whisk together the flour, remaining sugar, and salt. These dry ingredients will form the backbone of your bread.
Step 3: Combine Wet and Dry Ingredients
Once the yeast mixture is frothy, pour it into the dry ingredients, followed by the softened butter and the egg (if using). Mix everything together until it forms a shaggy dough. Use a wooden spoon or a sturdy spatula—this is a great workout for your arms, too!
Step 4: Knead the Dough
Now for the fun! Flour your countertop lightly and turn out your dough. Knead it for about 10 minutes or until it’s smooth and elastic. This step is crucial for developing the gluten that gives the bread its structure. If the dough is too sticky, sprinkle a little more flour as you go.
Step 5: First Rise
Place your kneaded dough into a greased bowl and cover it with a clean kitchen towel. Let it rise in a warm place for about an hour or until it has doubled in size. This is the moment when the magic happens!
Step 6: Shape the Dough
Once the dough has risen, punch it down gently to release any air pockets. Turn it out onto your floured surface and shape it into a loaf. You can form it into a classic rectangular loaf or a round shape—whatever tickles your fancy!
Step 7: Second Rise
Place the shaped dough into a greased loaf pan (or your desired baking dish). Cover and let it rise again for about 30-45 minutes, until puffed.
Step 8: Preheat the Oven
While your dough is on its second rise, preheat your oven to 350°F (175°C).
Step 9: Bake
Once the dough has risen, pop it in the oven and bake for about 30-35 minutes. Your kitchen will be filled with the glorious smell of baking bread! The loaf should be golden brown, and if you tap it gently, it’ll sound hollow.
Step 10: Cool and Slice
Let your Milk Bread cool in the pan for about 10 minutes before transferring it to a wire rack. When it’s cool enough to handle, slice it up, serve it warm with a pat of butter, or store it for later!
Serving Suggestions
Milk Bread is incredibly versatile. Here are some delightful serving ideas:
-
Toast it Up: Slice it thick, toast it, and spread with butter, jam, or a homemade cinnamon-honey spread.
-
Classic Sandwiches: Use it for any sandwich—both savory and sweet. Imagine a grilled cheese or peanut butter and banana combo!
-
French Toast: Milk Bread makes the fluffiest French toast. Dip slices into an egg mixture and pan-fry!
-
Bread Pudding: If you have leftover bread (which is rare!), try using it for a delicious bread pudding.
-
Warm with Soup: Serve slices alongside your favorite soup for a cozy meal.
Recipe Variations
Feel free to play around with this Milk Bread recipe! Here are a few fun variations to help you experiment:
-
Herbed Milk Bread: Add fresh herbs like rosemary or thyme into the dough for a savory twist—perfect for pairing with salads or pasta.
-
Sweet Additions: Fold in chocolate chips, nuts, or dried fruits before the second rise to create a delectable sweet bread.
-
Whole Wheat Option: Substitute half of the all-purpose flour with whole wheat flour for a nuttier flavor and increased fiber.
-
Cinnamon Swirl: Roll the dough out into a rectangle, sprinkle with a cinnamon sugar mixture, then roll it up tightly before shaping it into a loaf.
-
Vegan Version: Replace the butter with coconut oil and omit the egg; increase the milk proportion slightly for moisture.
Chef’s Notes
I love this Milk Bread not only for its taste but also for its nostalgia. My grandma’s gentle guidance taught me that cooking is about love—and that’s what I try to infuse in every loaf I make. The bread recipe has evolved over the years, adapting to different dietary needs and flavor profiles. It truly is about what feels right for you! And if the dough gets a little messy, just remember—some of the best things come from a little chaos in the kitchen!
FAQs and Troubleshooting
1. Why did my bread not rise?
If your bread didn’t rise, your yeast may have been expired, or the environment wasn’t warm enough. Make sure to activate the yeast correctly.
2. Can I freeze Milk Bread?
Absolutely! Once cooled, wrap the loaf in plastic wrap and then foil to prevent freezer burn. It can last up to three months!
3. My dough is too sticky; what should I do?
If your dough is too sticky, sprinkle in a bit of flour until it reaches a smooth consistency. Just remember, it’s better to add flour gradually!
4. How should I store my Milk Bread?
Keep it covered at room temperature for a few days, or slice and freeze it for longer shelf life. Always toast slices when you thaw; it brings the fluffiness back!
Nutritional Info
While enjoying Milk Bread, it’s important to consider the nutritional aspect:
- Calories: Approximately 120 calories per slice (based on a 16-slice loaf)
- Protein: About 3g
- Carbohydrates: Roughly 22g
- Fats: Around 3g
- Fiber: 0.5g (can vary based on whole grain substitutions)
This bread is a source of comfort, and when enjoyed in moderation with wholesome fillings or toppings, it fits nicely into a balanced diet!
Final Thoughts
There you have it—a complete guide to making your very own Milk Bread! It’s a journey of flavors, textures, and memories that bring us all together. Whether you’re toasting a slice for breakfast or using it for a late-night snack, each bite is a treasure that holds a story.
I hope you embrace the process, make some unforgettable moments, and share them with those you love! Now, throw on that apron, let your heart fuel your creativity in the kitchen, and most importantly—have fun! Happy baking!
— Emily
PrintSoft and Fluffy Milk Bread
A delightful recipe for soft and fluffy Milk Bread that’s perfect for any meal.
- Prep Time: 20 minutes
- Cook Time: 35 minutes
- Total Time: 55 minutes
- Yield: 16 slices 1x
- Category: Bread
- Method: Baking
- Cuisine: American
- Diet: Vegetarian
Ingredients
- 4 cups All-Purpose Flour
- 1 ½ cups Whole Milk, warmed
- ¼ cup Sugar
- 2 ¼ teaspoons Active Dry Yeast
- 1 teaspoon Salt
- ¼ cup Butter, softened
- 1 Egg, optional
Instructions
- Prepare the Yeast: Warm milk and sprinkle yeast over it, adding a pinch of sugar. Let it rest until frothy.
- Mix Dry Ingredients: Whisk together flour, remaining sugar, and salt in a bowl.
- Combine Wet and Dry Ingredients: Pour the yeast mixture into dry ingredients, add butter and egg (if using), and mix until shaggy.
- Knead the Dough: Flour a surface lightly and knead the dough for about 10 minutes until smooth.
- First Rise: Place the dough in a greased bowl, cover, and let it rise in a warm place for about 1 hour.
- Shape the Dough: Punch down the dough and shape it into a loaf.
- Second Rise: Place in a greased loaf pan and let it rise for about 30-45 minutes.
- Preheat the Oven: While dough rises, preheat the oven to 350°F (175°C).
- Bake: Bake for about 30-35 minutes until golden brown.
- Cool and Slice: Cool in the pan for 10 minutes before transferring to a wire rack and slicing.
Notes
This Milk Bread is perfect for toasting or making sandwiches. It can be customized with various additions for different flavors.
Nutrition
- Serving Size: 1 slice
- Calories: 120
- Sugar: 5g
- Sodium: 400mg
- Fat: 3g
- Saturated Fat: 1.5g
- Unsaturated Fat: 1.5g
- Trans Fat: 0g
- Carbohydrates: 22g
- Fiber: 0.5g
- Protein: 3g
- Cholesterol: 40mg
Keywords: milk bread, baking, soft bread, homemade bread, fluffy bread