emmawhitaker
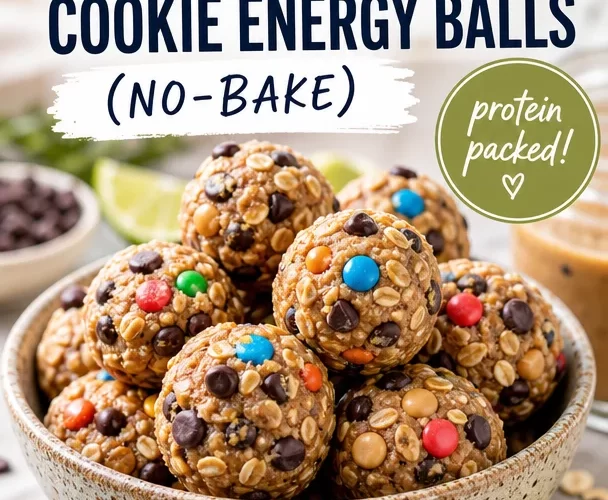
Monster Cookie Energy Balls: A Delicious Adventure
Welcome to the joy-filled world of cooking, where every meal is an opportunity for love, laughter, and a sprinkle of creativity! Today, I’m thrilled to share with you one of my favorite recipes: Monster Cookie Energy Balls. These little power-packed treats are not just a snack; they’re a delightful combination of nostalgia and nutrition that’s perfect for busy days, afternoon pick-me-ups, or even as a fun addition to your kids’ lunchboxes. Let’s dive into this mouthwatering journey and rediscover the joy of cooking together!
A Taste of Nostalgia
Growing up, I remember coming home from school feeling just a little worn out. My mom, ever the kitchen wizard, always seemed to know the perfect remedy: her famous monster cookies. You know the type—big, chewy, and studded with chocolate, peanut butter, and those colorful M&M’s that make everything more exciting!
One particular afternoon, I rushed through the front door, and the heavenly aroma of peanut butter and warm cookies enveloped me like a cozy hug. My mom was in the kitchen with a huge baking sheet, and she handed me a warm cookie right off the tray. I can still feel the rush of joy that hit me as I took a bite, the sweet, salty flavors melting together in perfect harmony. It was my happy place!
Now, as I’ve grown into my own cooking journey, I decided to put a healthier twist on those monster cookies by creating Monster Cookie Energy Balls. They capture all those warm memories while being wholesome enough to fuel your day. Join me as we make a treat that not only satisfies your sweet tooth but also brings the love of home-cooked magic to your everyday life!
Ingredients
Here’s what you’ll need to whip up these fabulous energy balls:
-
2 cups rolled oats: The base of our energy balls, rolled oats provide not just texture but also a healthy dose of fiber. If you’re gluten-free, look for certified gluten-free oats!
-
1 cup peanut butter: The star ingredient! You can use creamy or crunchy based on your preference. If you have nut allergies, try sunflower seed butter or almond butter as tasty substitutions.
-
1/2 cup honey: This natural sweetener adds moisture and binds everything together. Agave syrup or maple syrup work well for a vegan alternative.
-
1 cup chocolate chips: Because chocolate makes everything better! Use dark chocolate, semi-sweet, or even white chocolate chips for a sweeter bite.
-
1 cup M&M’s: These colorful candies add that vibrant pop and a touch of fun! Feel free to swap them out for your favorite dried fruits or nuts.
-
1/4 cup chia seeds (optional): A fabulous source of omega-3 fatty acids, chia seeds can enhance the nutritional profile. Leave them out for a simpler texture or add them for a health boost.
-
1/2 tsp vanilla extract (optional): A splash of vanilla adds a warm, sweet aroma that makes everything better. You could also explore almond extract for a different twist.
Step-by-Step Instructions
Now that we have our ingredients, let’s get cooking! This recipe is simple, and I can promise you that the steps are just as fun as the finished product!
-
Gather Your Ingredients: Start by gathering all your ingredients into your mixing bowl. This is what I call a ‘mise en place’—it makes the cooking process smoother and more enjoyable. Plus, it sets a fun tone for your kitchen adventure!
-
Mix the Oats and Peanut Butter: In a large mixing bowl, add the rolled oats and peanut butter. Use a spatula or your hands—get in there! The heat from your hands can help soften the peanut butter. If you find it a bit too tough, warming the peanut butter slightly in the microwave can help!
-
Incorporate Honey: Next, drizzle the honey into the mix. This sweet sticky goodness will help to bind the energy balls together. Don’t be shy; get in there and mix! You want everything to be well-incorporated, so the flavors blend beautifully.
-
Add Chocolate Chips and M&M’s: Fold in your chocolate chips and M&M’s. This is the fun part! As you mix, just imagine how delightful it’ll be to bite into one of these treats and find those colorful candies, each adding a pop of sweetness!
-
Chia Seeds and Vanilla: If you’re adding chia seeds and vanilla extract, now’s the time! Not only do they provide a nutritional boost, but the vanilla will make your kitchen smell heavenly. Stir well until everything is evenly distributed.
-
Form the Balls: Now, with clean hands, grab a small handful of the mixture and roll it into balls (about the size of a tablespoon). You can adjust the size to your liking—go big or go small, it all tastes great! Place the balls on a baking sheet lined with parchment paper for easy cleanup.
-
Chill and Enjoy: Cover your energy balls with plastic wrap or a lid and pop them into the refrigerator for about 30 minutes. This chilling step helps them firm up so they hold their shape. But don’t wait too long—you might not be able to resist a taste-test!
Serving Suggestions
These Monster Cookie Energy Balls are perfect for snacking on the go, but if you’re feeling fancy, here are some serving suggestions:
-
Snack Attack: Serve them straight from the fridge for a refreshing treat anytime you have a craving or need a quick energy boost.
-
Family Fun: Arrange them on a colorful plate during family gatherings or playdates. How about a little DIY "decorate your energy ball" station? Just set out some extra ingredients like coconut flakes, nuts, or mini chocolate chips for everyone to customize their snacks!
-
Gift Idea: Pack them in a cute jar as a thoughtful homemade gift for friends or family members. Your loved ones will feel cherished, and you’ll have a delightful conversation starter.
Recipe Variations
Here are a few creative twists you can try!
-
Nut-Free: Replace the peanut butter with sunbutter or pumpkin seed butter for a nut-free alternative that’s just as delicious.
-
Different Mix-Ins: You could experiment with dried fruits like cranberries or apricots for added sweetness and texture.
-
Protein Punch: Add 1/4 cup of protein powder into the mix for an extra boost—great if you’re looking to power up your post-workout snack!
-
Spicy Sweet: For a little edge, sprinkle in some cinnamon or even a pinch of cayenne for warm flavors with a kick.
-
Chocolate Lover’s Dream: Double the chocolate chips and hide a few mini marshmallows inside for a Gooey Chocolate Surprise Energy Ball!
Chef’s Notes
As I continue to experiment in the kitchen, I keep discovering new ways to enhance this classic recipe. The joy comes not just from the deliciousness, but from the memories each batch helps create. One day, I was making these energy balls while chatting with my best friend on the phone. Once we got off, I realized I had made an entirely different recipe! I had swapped out the oats for granola and mixed in some coconut flakes—and voilà! A new recipe was born!
These energy balls have evolved into part of my family’s routine. Whenever there’s a busy week ahead, you bet I’m making a double batch—because trust me, they disappear fast!
FAQs and Troubleshooting
1. My energy balls are too crumbly. What can I do?
If your mixture is too crumbly, it may need a bit more peanut butter or honey to help bind it together. Try adding a tablespoon at a time until you reach the right consistency.
2. Can I freeze these energy balls?
Absolutely! These energy balls freeze wonderfully. Just place them in an airtight container with parchment paper between layers. When you’re ready for a snack, let them thaw for a few minutes, or enjoy them slightly frozen for a refreshing treat!
3. How long do these last?
These energy balls can be stored in the fridge for about a week or in the freezer for up to three months, but trust me, they won’t last that long!
4. I don’t like chocolate. What can I substitute?
If chocolate isn’t your thing, you can skip the chocolate chips and M&M’s altogether, and use a variety of seeds, dried fruits, or spices for flavor. The world is your oyster when it comes to creating your energy balls.
So, there you have it—your complete guide to making Monster Cookie Energy Balls! This recipe is not just about the food; it’s about sharing moments, creating memories, and reminding ourselves that cooking can bring joy. Get in the kitchen, invite some friends or family, and let the laughter (and deliciousness) begin! Happy cooking!
PrintMonster Cookie Energy Balls

Wholesome and delicious energy balls that combine nostalgia with nutrition, perfect for a quick snack or a fun addition to lunchboxes.
- Prep Time: 15 minutes
- Cook Time: 0 minutes
- Total Time: 15 minutes
- Yield: 24 energy balls 1x
- Category: Snacks
- Method: No-Bake
- Cuisine: American
- Diet: Vegetarian
Ingredients
- 2 cups rolled oats
- 1 cup peanut butter
- 1/2 cup honey
- 1 cup chocolate chips
- 1 cup M&M’s
- 1/4 cup chia seeds (optional)
- 1/2 tsp vanilla extract (optional)
Instructions
- Gather your ingredients into a mixing bowl for easy access.
- Mix the oats and peanut butter until well combined.
- Incorporate the honey to bind the mixture together.
- Add in the chocolate chips and M&M’s for sweetness and fun.
- Stir in chia seeds and vanilla extract, if using.
- Form the mixture into balls and place them on a lined baking sheet.
- Chill in the refrigerator for about 30 minutes before enjoying.
Notes
These energy balls can be customized with different mix-ins and are easy to store in the fridge or freezer.
Nutrition
- Serving Size: 1 energy ball
- Calories: 150
- Sugar: 10g
- Sodium: 50mg
- Fat: 7g
- Saturated Fat: 1g
- Unsaturated Fat: 6g
- Trans Fat: 0g
- Carbohydrates: 19g
- Fiber: 2g
- Protein: 4g
- Cholesterol: 0mg
Keywords: energy balls, snacks, healthy treats, no-bake dessert