emmawhitaker
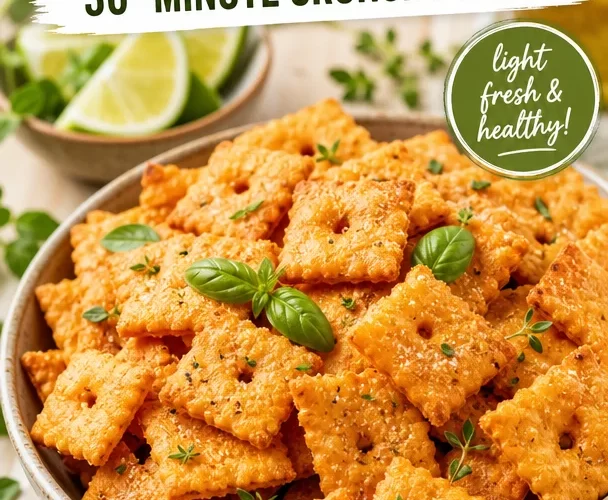
Homemade Healthy Cheez-Its: A Delightful Twist on a Classic Snack
Welcome, dear friends! Today, we’re diving into the world of snacks with a homemade twist on a classic favorite—Cheez-Its! If you’re anything like me, those crispy, cheesy squares were a staple in your childhood snack repertoire. But what if I told you that you could whip up a healthier version right in your own kitchen? Not only will these homemade Cheez-Its be bursting with flavor, but they’ll also be made with love and wholesome ingredients. So grab your apron, and let’s get cooking!
Personal Story
Let me take you back to my childhood, when I would scamper into the kitchen after school, my mind racing with after-school snack ideas. The air would be filled with the tempting aroma of something wonderful in the oven—my mom was a genius at creating delicious bites that drew everyone together after a long day. One snack that always made an appearance? Good old Cheez-Its! Their crunchy texture and cheesy goodness always got me smiling, often leading to battles over who could grab the most from the snack bowl.
Fast forward to today, and I still find myself craving those delicious squares. However, I wanted to bring more of “me” into that snack—make it healthier without losing any of that childhood joy. That’s how my homemade healthy Cheez-Its were born! These little squares are simple to make, delightful to eat, and give a nod to nostalgic flavors, all while being kinder to your body. Let’s see how you can bring a taste of that everyday nostalgia to your kitchen!
Ingredients
Before we dive into the kitchen, let’s gather our ingredients! Here’s what you’ll need:
-
1 cup sharp cheddar cheese, shredded
The star of the show! Sharp cheddar gives that robust flavor that we all crave. If you’re looking for a dairy-free option, feel free to use a shredded plant-based cheese. -
1/2 cup whole wheat flour
This whole grain flour adds a nutty flavor and brings more fiber to our homemade treat. You can substitute with all-purpose flour if you prefer a lighter texture. -
1/4 cup unsalted butter, softened
Butter adds richness to our Cheez-Its. If you’re looking for a lighter version, avocado or coconut oil can work as a healthier alternative. -
1/2 teaspoon salt
Just the right balance to accentuate that cheesy goodness! You can reduce it or opt for garlic salt for added flavor. -
1/4 teaspoon paprika (optional)
A dash of paprika not only gives a subtle smokiness but also a beautiful hue to our snack. Feel free to swap with cayenne pepper if you like a kick! -
1/4 teaspoon garlic powder (optional)
Essential for that lovely depth of flavor. You can leave it out if you want to keep it straightforward! -
Ice water as needed
The magic ingredient to bind everything together. You can replace it with cold milk for more richness.
Step-by-Step Instructions
Now that we have everything lined up, let’s get to the fun part—making our Cheez-Its! Here’s how you can get those cheesy squares onto your plate:
-
Preheat your oven
Start by preheating your oven to 350°F (175°C). This step is crucial to ensure that our Cheez-Its come out perfectly golden and crispy. -
Mix the dry ingredients
In a mixing bowl, combine the whole wheat flour, salt, and any optional spices like paprika and garlic powder. This is a great time to showcase your culinary skills; feel free to use a whisk to incorporate everything evenly. -
Add the cheese
Next, fold in the shredded cheddar cheese until well mixed with the dry ingredients. Just picture that beautiful cheesy blend—yum! The cheese should coat the flour mixture like a cozy blanket, ensuring every bite is cheesy goodness. -
Incorporate the butter
Add the softened unsalted butter to the cheese-flour mix, using a fork to blend it in until crumbly. It should resemble coarse crumbs—don’t worry if it looks a little rough; we’ll smooth it out soon! -
Add ice water
Gradually add ice water, one tablespoon at a time, mixing until your dough comes together. You want it to be pliable but not sticky. Too much water can harm the texture, so be sure to go slow here! The dough should feel just right—smooth and slightly tacky. -
Roll the dough
On a floured surface, roll out the dough to about 1/8-inch thickness. Remember, the thinner you roll, the crunchier your Cheez-Its will be. Grab your favorite rolling pin, and let’s get to it! -
Cut the squares
Use a pizza cutter or a knife to cut the dough into small squares, about 1-inch in size. Feel free to make them any shape you fancy! For an extra touch, use a fork to prick holes in the center of each square—this little hack helps them cook evenly. -
Bake
Place your squares on a baking sheet lined with parchment paper, giving them a bit of space apart. Bake them in the preheated oven for about 12-15 minutes, or until they turn golden brown. Keep an eye on them; ovens vary, and we want them to be just right! -
Cool down
Once done, take them out of the oven and let them cool on the baking sheet for a few minutes. This is a tough waiting game, but trust me, it’s worth it! Afterward, transfer them to a wire rack to cool completely.
Serving Suggestions
Now that your homemade Cheez-Its are ready, how should you serve them? These delightful squares are perfect on their own, but you can also try pairing them with your favorite dips, like hummus or guacamole. For a cheese lover’s experience, serve them alongside a cheese platter with fruits and nuts. For movie nights, they are snacks that outshine all others!
Recipe Variations
Feeling adventurous? Here are some fun variations you can try:
- Herbed Cheez-Its: Add finely chopped fresh rosemary or thyme to the dough for an aromatic twist.
- Spicy Cheez-Its: Toss in a pinch of cayenne pepper to the dry ingredients to kick up the heat.
- Cheesy Kale Cheez-Its: Mix in finely chopped, sautéed kale for a nutrient boost!
- Sweet Cheez-Its: Experiment by adding a sprinkle of cinnamon and a touch of honey to give a sweet spin!
Chef’s Notes
As I was developing this recipe, I found myself reminiscing about those afternoon snack times when everyone gathered at the table munching and chatting. I’ll let you in on a little secret—sometimes I sneak a small handful while they’re still warm, completely stealing the moment! This recipe has evolved over time as I tried different flours and cheeses. The magic lies in discovering your personal twist; remember, cooking is all about joy, experimentation, and love.
FAQs and Troubleshooting
1. Why aren’t my Cheez-Its crispy?
Make sure that you’ve rolled the dough out thin enough. Thicker dough can lead to chewy snacks rather than crispy ones. Also, ensure they’re baked until they’re golden brown!
2. Can I store these?
Absolutely! Store them in an airtight container at room temperature. They stay crunchy for about a week, if they last that long!
3. Can I use low-fat cheese?
Yes, you can substitute with lower-fat cheese options, but keep in mind that the flavor and texture may differ slightly.
4. My dough is too crumbly! What should I do?
If your dough feels too dry, add a touch more ice water, a teaspoon at a time. Be cautious; you don’t want it to be sticky!
And there you have it, my lovely foodies! Your very own batch of homemade healthy Cheez-Its that’ll take you back while also keeping things fresh and nutritious. I hope you enjoy making these cheesy delights as much as I do and that they bring you joy, nostalgia, and some crunchy goodness. Happy snacking! 🧀✨
PrintHomemade Healthy Cheez-Its

A healthier twist on the classic Cheez-It snack, made with wholesome ingredients and bursting with flavor.
- Prep Time: 15 minutes
- Cook Time: 15 minutes
- Total Time: 30 minutes
- Yield: 4 servings 1x
- Category: Snack
- Method: Baking
- Cuisine: American
- Diet: Vegetarian
Ingredients
- 1 cup sharp cheddar cheese, shredded
- 1/2 cup whole wheat flour
- 1/4 cup unsalted butter, softened
- 1/2 teaspoon salt
- 1/4 teaspoon paprika (optional)
- 1/4 teaspoon garlic powder (optional)
- Ice water as needed
Instructions
- Preheat your oven to 350°F (175°C).
- Mix the whole wheat flour, salt, and optional spices in a mixing bowl.
- Add the shredded cheddar cheese until well mixed.
- Incorporate the softened unsalted butter until crumbly.
- Add ice water gradually, mixing until the dough comes together.
- Roll out the dough to about 1/8-inch thickness on a floured surface.
- Cut the dough into small 1-inch squares.
- Bake on a parchment-lined baking sheet for 12-15 minutes until golden brown.
- Cool on a wire rack after baking.
Notes
Store in an airtight container at room temperature for up to a week. For variations, try adding herbs or spices to the dough.
Nutrition
- Serving Size: 1 serving
- Calories: 150
- Sugar: 1g
- Sodium: 200mg
- Fat: 10g
- Saturated Fat: 6g
- Unsaturated Fat: 3g
- Trans Fat: 0g
- Carbohydrates: 15g
- Fiber: 2g
- Protein: 5g
- Cholesterol: 20mg
Keywords: Cheez-Its, homemade snacks, healthy snacks, vegetarian snacks, cheese, baking