emmawhitaker
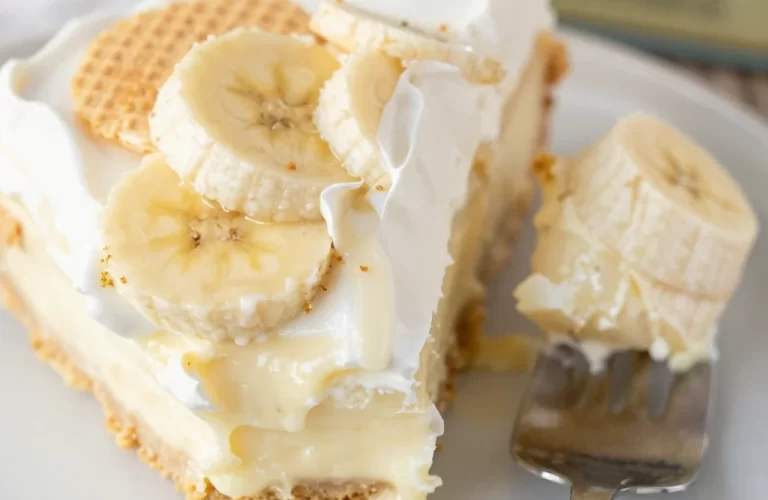
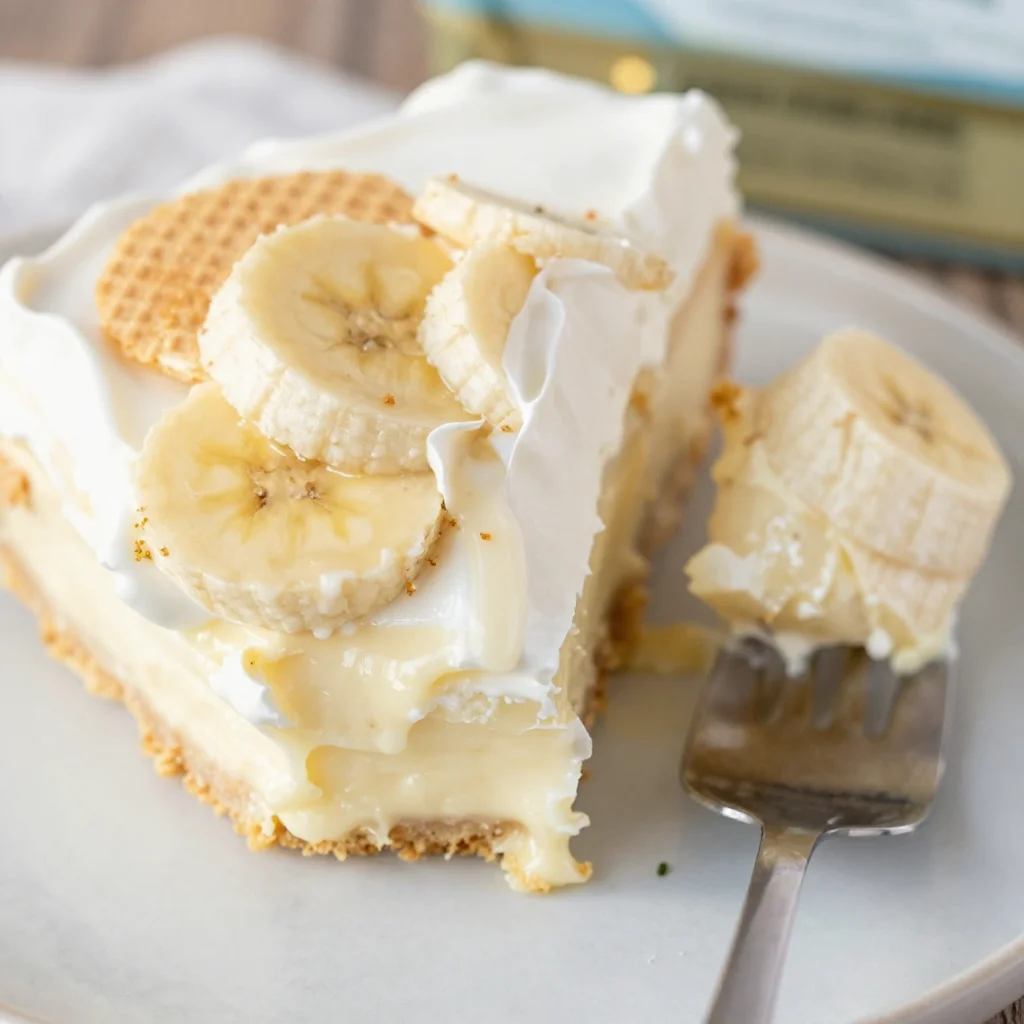
No Bake Banana Pudding Cheesecake: A Slice of Nostalgia
There’s something magical about desserts that whisk us back to our childhood—like a cozy hug after a long day. One of my all-time favorites has to be banana pudding. Whether it was at family gatherings or just a classic Sunday treat, this creamy delight has forever held a special place in my heart. But let’s be honest: who has the time (or the patience) to bake a cake from scratch these days? Enter my No Bake Banana Pudding Cheesecake!
In this delightful recipe, I’ve taken the best of both worlds: the traditional layers of banana pudding and the rich creaminess of cheesecake, all wrapped up in a quick-and-easy no-bake version. It’s a dessert the whole family will devour, and the best part? You can whip it up in just a few simple steps. With a blend of whipped cream, cream cheese, fresh bananas, and crunchy vanilla wafers, your taste buds will be singing, and your kitchen will smell like heaven. Not to mention, it’s an absolute showstopper at gatherings—everyone will be reaching for seconds (or thirds)!
So grab your mixing bowl and let’s dive into a world of creamy, dreamy goodness! With my handy tips, tricks, and a sprinkle of love, you’ll be able to create this delightful cheesecake that feels like home. Let’s get cooking!
A Slice of Nostalgia
Growing up, Sunday dessert was practically a ritual in my family. Gathered around the table with laughter and stories, we would indulge in whatever sweet treat my mom had conjured up that day. My favorite? You guessed it—banana pudding. The way the smooth custard blended harmoniously with the bananas and crunchy vanilla wafers sent my taste buds soaring!
One specific memory that stands out is the day I decided to try making it myself. I was a kid, classically curious and always ready for a cooking adventure. Armed with my mom’s handwritten recipe, I summoned all my courage. As I mixed and stirred, I could already imagine my family’s reactions. But when it came time to layer the pudding and slice the bananas, chaos struck! The bananas turned brown too quickly, and I accidentally dropped a bowl of whipped cream (yes, you can imagine the scene).
It was a disaster, but the smile on my family’s faces as we laughed through the mess made it all worthwhile. That warm feeling of sharing a dessert with loved ones has stuck with me. Fast forward to today, and I’ve taken all that nostalgia, paired it with my love for cooking, and transformed it into this delicious no-bake cheesecake. Trust me; it’s as easy and rewarding as it gets!
Ingredients
To make this scrumptious No Bake Banana Pudding Cheesecake, here’s what you’ll need:
-
1 package (8 oz) cream cheese, softened
- Cream cheese adds that rich, tangy flavor. If you want a lighter option, use Neufchâtel cheese or a vegan cream cheese alternative!
-
1 cup powdered sugar
- This sweetens the mix without the grittiness of granulated sugar. Want to cut back on sugar? You can use a sugar substitute that measures like sugar!
-
2 cups heavy whipping cream
- This is what gives your cheesecake that fluffy, cloud-like texture. If you’re looking for a lighter version, coconut cream works wonderfully!
-
2 ripe bananas, sliced
- The star of the show! Ripe bananas are sweeter and easier to mash. You can mix in some caramelized bananas for a twist!
-
1 cup vanilla pudding mix
- Adds a creamy texture and flavor. You can use instant pudding for a quicker option or try a coconut pudding for something unique!
-
2 cups milk
- This will be mixed with the pudding. Almond or oat milk work great for a dairy-free alternative!
-
1 teaspoon vanilla extract
- A must-have for flavor! Feel free to swap with almond extract for a fun twist!
-
1 package (10 oz) vanilla wafers
- These add crunch and flavor. If you want a gluten-free option, there are many brands making delicious gluten-free wafers!
-
Additional banana slices and whipped cream for topping
- This is all about presentation! You can sprinkle some crushed wafers on top for added texture!
Now that we’ve got our dream team of ingredients, let’s get to the fun part!
Step-by-Step Instructions
Step 1: Prepare the Cream Cheese Mixture
-
Soften the cream cheese: Make sure your cream cheese is at room temperature. This step is key to avoid lumps! If you’re in a hurry, you can microwave it for about 10-15 seconds.
-
Mix it up: In a large mixing bowl, beat the softened cream cheese with an electric mixer until smooth. Slowly add in the powdered sugar, and continue beating until it’s creamy and delightful.
Step 2: Whip that Cream
-
Get your whipping cream ready: In another bowl (a chilled bowl works best!), pour in the heavy whipping cream. Beat it on medium speed until soft peaks form. Don’t over-whip; you don’t want butter here!
-
Fold it in: Gently fold the whipped cream into your cream cheese mixture with a spatula. Go slowly; we want to keep that light and airy texture.
Step 3: Create the Pudding Mixture
- Mix the pudding: In a separate bowl, whisk the vanilla pudding mix with 2 cups of milk. Keep whisking until it thickens—this should take about 2-3 minutes. Add in the vanilla extract to enhance that beautiful flavor.
Step 4: Combine It All
- Blend the mixtures: Now, fold the pudding blend into the previous cream cheese and whipped cream mixture. Again, be gentle but thorough! This beautiful concoction is going to be the heart of your cheesecake.
Step 5: Layer It Up
-
Begin layering: Start with a layer of vanilla wafers at the bottom of your prepared springform pan. You can break some to cover gaps—no waste here!
-
Time to add the bananas: Layer some of the banana slices evenly over the wafers, then pour a generous layer of your creamy mixture over the bananas. Repeat the layers (wafers, bananas, creamy goodness) until you reach the top.
Step 6: Chill and Serve
-
Chill it out: Cover the springform pan with plastic wrap and place it in the refrigerator for at least 4-6 hours. Letting it chill is essential for our cheesecake to set.
-
Final touches: Once set, release your cheesecake from the springform pan. Top with additional banana slices and whipped cream before serving.
Serving Suggestions
For the perfect presentation, slice your No Bake Banana Pudding Cheesecake into generous pieces. Serve it on a beautiful plate and drizzle some chocolate sauce or caramel over the top for an extra wow factor. If you’re feeling fancy, you could even garnish it with a sprig of mint! This dessert is sure to be the showstopper of your meal.
Recipe Variations
Feeling adventurous? Here are a few twists you can try with your No Bake Banana Pudding Cheesecake:
-
Chocolate Lover’s Delight: Stir some cocoa powder into your pudding mix for a decadent chocolate twist!
-
Tropical Paradise: Add crushed pineapple to the banana layers to make a fun pineapple-banana fusion.
-
Nutty Crunch: Incorporate crushed nuts like pecans or walnuts into the layers for an added crunch.
-
Boozy Banana: A splash of rum or Kahlua in the cream mixture can add a wonderful depth of flavor for adult gatherings.
Chef’s Notes
As I’ve grown as a chef, I’ve found that the most special recipes evolve over time. This No Bake Banana Pudding Cheesecake was born from my memories of family, laughter, and a dash of kitchen chaos! I’ve tinkered with the recipe, and it has been a delight to see how little changes can make a delightful impact.
And let me tell you, if you ever drop some whipped cream, just grab a spatula and smooth it out—life’s too short to let a little mess ruin your fun! Embrace those happy accidents in the kitchen; they often lead to the best stories.
FAQs and Troubleshooting
1. Can I use dairy-free alternatives?
Absolutely! You can swap cream cheese for a vegan alternative and use coconut cream instead of heavy whipping cream. Your cheesecake will still turn out delicious.
2. What’s the best way to store leftovers?
Cover your cheesecake tightly with plastic wrap to keep it fresh in the fridge for up to a week. Before serving leftovers, give it a quick garnish to make it look fresh again!
3. Why is my cheesecake not setting?
If it’s not setting properly, it may be due to not enough whipping cream or not chilling long enough. Ensure you’re folding properly to maintain texture, and give it a full chill time!
4. Can I make this ahead of time?
Absolutely! This cheesecake is perfect for making a day in advance. Just let it set overnight in the refrigerator for the best flavor and texture.
Nutritional Info
(Note: Nutritional information will vary based on specific ingredients used and portion sizes; adjust accordingly.)
Per slice (based on 12 slices):
- Calories: 300
- Protein: 3g
- Carbohydrates: 34g
- Fat: 17g
- Sugar: 12g
There you have it—your guide to not just making a No Bake Banana Pudding Cheesecake, but also creating wonderful memories in the kitchen! I can’t wait for you to try this recipe and share your delicious creations with loved ones. Happy cooking!
PrintNo Bake Banana Pudding Cheesecake

A delightful no-bake cheesecake combining layers of banana pudding and rich creaminess for a nostalgic dessert.
- Prep Time: 20 minutes
- Cook Time: 0 minutes
- Total Time: 360 minutes
- Yield: 12 servings 1x
- Category: Dessert
- Method: No-Bake
- Cuisine: American
- Diet: Vegetarian
Ingredients
- 1 package (8 oz) cream cheese, softened
- 1 cup powdered sugar
- 2 cups heavy whipping cream
- 2 ripe bananas, sliced
- 1 cup vanilla pudding mix
- 2 cups milk
- 1 teaspoon vanilla extract
- 1 package (10 oz) vanilla wafers
- Additional banana slices and whipped cream for topping
Instructions
- Prepare the Cream Cheese Mixture: Soften the cream cheese until at room temperature. Beat with an electric mixer, adding powdered sugar until creamy.
- Whip that Cream: In a chilled bowl, pour in the heavy whipping cream. Beat until soft peaks form; then fold into the cream cheese mixture.
- Create the Pudding Mixture: Whisk the vanilla pudding mix with 2 cups of milk until thickened. Stir in vanilla extract.
- Combine It All: Fold the pudding mix into the cream mixture until well combined.
- Layer It Up: Layer vanilla wafers, banana slices, and cream mixture in a springform pan. Repeat layers.
- Chill and Serve: Cover and refrigerate for 4-6 hours. Once set, top with banana slices and whipped cream before serving.
Notes
For a fun twist, try adding crushed pineapple or nuts between the layers.
Nutrition
- Serving Size: 1 slice
- Calories: 300
- Sugar: 12g
- Sodium: 200mg
- Fat: 17g
- Saturated Fat: 10g
- Unsaturated Fat: 5g
- Trans Fat: 0g
- Carbohydrates: 34g
- Fiber: 1g
- Protein: 3g
- Cholesterol: 40mg
Keywords: banana pudding, cheesecake, no-bake dessert, easy recipe, childhood memories