 emmawhitaker
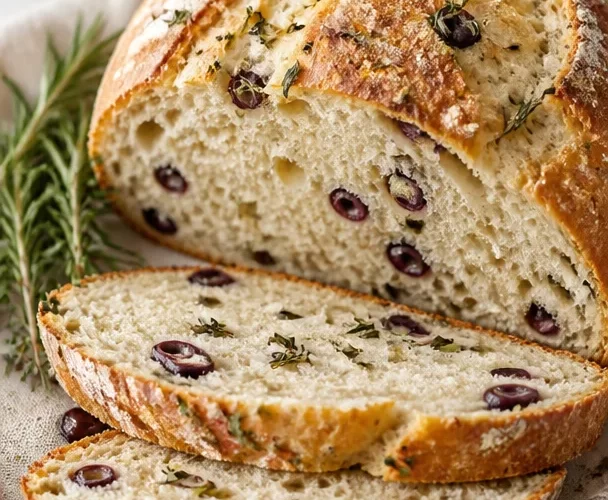
Olive Herb Bread: A Delicious Journey from My Kitchen to Yours
Hey there, bread lovers! Today, I’m thrilled to share a recipe that has a special place in my heart: Olive Herb Bread! 🍞✨ This scrumptious loaf is a wonderful fusion of flavors that not only makes your kitchen smell heavenly but also elevates any meal into a gourmet experience. So, if you’re ready to embark on a culinary journey filled with warmth and deliciousness, let’s dive into this olive herb bread adventure together!
Introduction
Making homemade bread is one of life’s greatest pleasures, isn’t it? Imagine the moment when your friends or family walk into your home, and the inviting aroma of freshly baked bread wraps around them like a cozy blanket. That’s what making Olive Herb Bread is all about! This delightful recipe merges the earthy and rich tones of olives with fragrant herbs, creating a loaf that’s not just food, but an experience.
I still remember the first time I got my hands into bread dough. It was a rainy Saturday afternoon, and I was feeling a bit adventurous (or perhaps just a little bored!). I rummaged through my pantry and found some olives and fresh herbs lingering there, waiting to be transformed. What began as a casual experiment turned into an unforgettable experience—I ended up with a loaf that was so delectable, it vanished in minutes!
Personal Story
This bread traces back to a sunny family gathering at my grandma’s house, where everything was homemade, and every dish came with a story. Grandma Lila, an incredible cook, had a way of bringing people together around the table. One afternoon, she pulled out her recipe book—a treasure trove of handwritten notes—and announced it was time to make her famous olive herb bread.
With flour dusting our hands and laughter filling the air, we kneaded and shaped the dough, all while she shared tales of her travels to Mediterranean countries where olives were a staple. Every time she added an ingredient, she would recount a memory or a lesson learned through her kitchen escapades. That bread became not just a dish we enjoyed, but a living memory, bonding us together through the simple act of cooking.
Now, every time I make this olive herb bread, I’m reminded of those cherished moments and the love that infuses every loaf.
Ingredients
Let’s gather our ingredients! Here’s what you’ll need to whip up this incredible Olive Herb Bread:
-
Bread Flour (4 cups)
This provides the right structure and chewiness for your bread. If you don’t have bread flour, all-purpose flour will work in a pinch, but the texture might be slightly different. -
Warm Water (1 ½ cups)
The yeast loves a cozy bath! This helps activate the dry yeast. Just make sure the water is warm, not hot, to prevent killing the yeast. -
Active Dry Yeast (2 ¼ teaspoons or 1 packet)
The magic ingredient! If you’d like a slower rise, you can use instant yeast or even a sourdough starter (about 1 cup) for an extra tang. -
Olives (1 cup, pitted and chopped)
I love using a mix of green and black olives for that robust flavor. Don’t hesitate to experiment with different varieties though—kalamata, green Castelvetrano, or even tangy green olives add unique flavors. -
Fresh Herbs (¼ cup, chopped)
A mix of rosemary, thyme, and basil works wonders! If you don’t have fresh herbs, dried herbs can substitute; just remember that their flavors are more concentrated. -
Olive Oil (¼ cup)
Adds richness and flavor. You can replace it with melted butter for a different twist. -
Salt (2 teaspoons)
Essential for enhancing flavors. If you’re on a low-sodium diet, try Himalayan salt or reduce the quantity. -
Sugar (1 tablespoon)
Just a dash to help feed the yeast and balance the flavor. You can skip this if you prefer a more savory loaf.
Step-by-Step Instructions
Ready to make some flavorful bread? Let’s roll up our sleeves and get started!
-
Activate the Yeast
In a large mixing bowl, combine the warm water, yeast, and sugar. Let it sit for about 5-10 minutes until it becomes frothy. This means the yeast is alive and ready to work its magic! -
Mix Dry Ingredients
In a separate bowl, whisk together the bread flour and salt. This step ensures that the salt and flour are evenly distributed, preventing any bitter bites! -
Combine Mixtures
Once the yeast mixture is frothy, pour it into the bowl with your flour mixture. Add the olive oil and mix until it forms a shaggy dough. You can use a wooden spoon or your hands—trust me, it’s therapeutic! -
Knead the Dough
Transfer your dough onto a lightly floured surface. Knead it for about 8-10 minutes until it becomes smooth and elastic. Need a little help? Here’s a tip: if the dough sticks to your hands, sprinkle a bit more flour—but don’t overdo it! -
Add Olives and Herbs
Once your dough is smooth, flatten it slightly and sprinkle in the chopped olives and herbs. Fold the dough over and knead for another minute or two until the olives and herbs are evenly distributed. -
First Rise
Place the dough in a lightly greased bowl, cover it with a clean kitchen towel, and let it rise in a warm place for about 1-2 hours or until it doubles in size. You can even place it in a switched-off oven with the light on to create a cozy environment! -
Shape the Loaf
Gently punch down the risen dough to release the air. Turn it out onto a floured surface and shape it into a loaf or round, depending on your preference. -
Second Rise
Place the shaped dough in a greased loaf pan or on a baking sheet. Cover it again and let it rise for about another hour until it puffs up. -
Preheat the Oven
While your dough is rising, preheat your oven to 375°F (190°C). -
Bake
Once the dough has risen, pop it into the oven for 25-30 minutes or until it’s golden brown and sounds hollow when tapped on the bottom. Your home will soon be filled with the mouthwatering aroma of baking bread! -
Cool Down
Let the bread cool on a wire rack for at least 10-15 minutes before slicing. It’s tempting to slice while hot, but this helps the texture to set nicely.
Serving Suggestions
Now that your delicious Olive Herb Bread is ready, how do we serve this beauty? There’s no wrong answer here! Slice thick pieces and serve warm with a drizzle of olive oil for dipping. It pairs perfectly with a light salad or soup—imagine enjoying it alongside a vibrant Mediterranean salad or an aromatic tomato soup!
You can also try toasting slices for breakfast, spreading them with butter or cream cheese, or even making mini sandwiches for a picnic. For a showstopper appetizer, slice it into smaller pieces, toast them, and serve with a variety of dips like humus, tzatziki, or even a chunky olive tapenade!
Recipe Variations
Feeling a bit adventurous? Here are some creative twists you can try with this olive herb bread recipe:
-
Cheese Lovers’ Delight
Fold in some grated parmesan or crumbled feta into the dough for an extra delicious cheesy twist! -
Spicy Kick
Add crushed red pepper flakes or finely chopped jalapeños for a spicy flavor profile that will set your taste buds dancing. -
Sweet Herb Variation
Swap out the herbs for a sweet blend of rosemary and dried cranberries for a unique sweet-savory combination that’s perfect for brunch! -
Gluten-Free Option
Use a gluten-free bread flour blend to make it accessible for everyone in your life. Just be sure to add a tablespoon of xanthan gum for texture. -
Nutty Crunch
Try adding a mix of sunflower seeds or walnuts for a delightful crunch. Just sprinkle them in when you’re incorporating the olives and herbs.
Chef’s Notes
Baking is such a personal process, isn’t it? This recipe has evolved over time, as I experimented with different types of olives and herbs. There was that one infamous batch where I added way too many green olives, and let’s just say we learned that a balance is key!
I’ve even had friends come over and contribute their favorite olives—each batch has a story and a unique twist that makes it even more special! So, don’t stress if it’s not perfect; it’s all about enjoying the process and creating tasty memories.
FAQs and Troubleshooting
1. Why did my bread not rise?
This can happen if the yeast is old or if the water used was too hot. Always ensure your yeast is fresh and that you’re using warm (not hot) water.
2. How can I tell if my bread is fully baked?
Tap the bottom of the loaf gently—if it sounds hollow, it’s ready! You can also check the internal temperature; it should be about 190°F (88°C).
3. My dough is too sticky; what do I do?
If it’s sticky, sprinkle in a bit of flour while kneading. However, if it feels like a soggy mess, it may need a bit more flour than the recipe calls for. Just add gradually!
4. Can I freeze the bread?
Absolutely! Once the bread is cool, you can slice it and freeze it in a freezer-safe bag. Thaw at room temperature or toast it for a quick treat!
Nutritional Info
For those curious about the nutritional side of things, here’s a rough breakdown:
- Serving Size: 1 slice (approx. 60g)
- Calories: 150
- Total Fat: 5g (Saturated Fat: 1g)
- Cholesterol: 0mg
- Sodium: 200mg
- Carbohydrates: 22g (Dietary Fiber: 1g, Sugars: 0g)
- Protein: 4g
Note: Nutritional values can vary depending on ingredient choices and serving sizes.
Final Thoughts
Baking Olive Herb Bread is more than just crafting a delicious loaf; it’s about the love, laughter, and memories made along the way. It’s a recipe to bring people together, flavor to brighten the dinner table, and a reason to gather and share stories over a wonderful meal. So, every time you slice into a loaf, remember that cooking is about creating connections, fun moments, and delicious food.
I can’t wait for you all to try this recipe! Share your experiences and any variations you come up with; I’d love to hear how your olive herb bread turns out! Happy baking, my friends! 🍞❤️
PrintOlive Herb Bread
A delicious blend of olives and fragrant herbs, this Olive Herb Bread is perfect for any meal.
- Prep Time: 20 minutes
- Cook Time: 30 minutes
- Total Time: 120 minutes
- Yield: 12 servings 1x
- Category: Bread
- Method: Baking
- Cuisine: Mediterranean
- Diet: Vegetarian
Ingredients
- 4 cups Bread Flour
- 1 ½ cups Warm Water
- 2 ¼ teaspoons Active Dry Yeast (or 1 packet)
- 1 cup Olives, pitted and chopped
- ¼ cup Fresh Herbs, chopped
- ¼ cup Olive Oil
- 2 teaspoons Salt
- 1 tablespoon Sugar
Instructions
- Activate the yeast: In a large mixing bowl, combine the warm water, yeast, and sugar. Let it sit for about 5-10 minutes until frothy.
- Mix the dry ingredients: In a separate bowl, whisk together the bread flour and salt.
- Combine the mixtures: Pour the yeast mixture into the flour mixture, add the olive oil, and mix until shaggy dough forms.
- Knead the dough: Transfer to a floured surface and knead for 8-10 minutes until smooth and elastic.
- Add olives and herbs: Flatten the dough, sprinkle in olives and herbs, and knead for another minute or two.
- First rise: Place in a greased bowl, cover, and let rise in a warm place for 1-2 hours or until doubled in size.
- Shape the loaf: Punch down the risen dough and shape it into a loaf or round.
- Second rise: Place shaped dough in a greased loaf pan, cover, and let it rise for another hour.
- Preheat the oven: Heat your oven to 375°F (190°C).
- Bake: Once risen, bake for 25-30 minutes until golden brown and sounds hollow when tapped.
- Cool down: Allow to cool on a wire rack for 10-15 minutes before slicing.
Notes
Serve this bread warm with olive oil for dipping or use it to make delicious sandwiches.
Nutrition
- Serving Size: 1 slice
- Calories: 150
- Sugar: 1g
- Sodium: 200mg
- Fat: 5g
- Saturated Fat: 1g
- Unsaturated Fat: 4g
- Trans Fat: 0g
- Carbohydrates: 22g
- Fiber: 1g
- Protein: 4g
- Cholesterol: 0mg
Keywords: bread, olive herb bread, baking, homemade bread, Mediterranean recipes


